Sunday, April 8, 2012

Hibernate Database Update Example

Using Hibernate library We can update a database easily. This post will describe how we can perform update operation on MySQL database.
Before trying to this you have to read my previous tutorial. I'm going to update same database used in that tutorial.

Here is the code :
package hibernatetest;

import java.util.Iterator;
import org.hibernate.Session;
import org.hibernate.SessionFactory;

/**
 *
 * @author Chathura
 */
public class HibernateTest {

    /**
     * @param args the command line arguments
     */
    public static void main(String[] args) {
       System.out.println("Test");
       Session session = null;
    try{
        SessionFactory sessionFactory = new org.hibernate.cfg.Configuration().configure().buildSessionFactory();
        session =sessionFactory.openSession();
        session.beginTransaction();
         
        String HQL_QUERY ="from Customer customers where customers.customerID = :customerId";
        org.hibernate.Query query = session.createQuery(HQL_QUERY);
        //Prepared statement
        query.setParameter("customerId",5);
   
          for(Iterator it=query.iterate();it.hasNext();){
             Customer customer = (Customer) it.next();
             customer.setCustomerName("Updated");
          }
          
        session.getTransaction().commit();
        System.out.println("Done!");
        }
     
    catch(Exception e){
        System.out.println(e.getMessage());
    }
  
  finally{
    session.flush();
    session.close();
  }
        
 }
}

This program will update customer name to "Updated" where customer ID = 5 (Look line 27)

Result :

If you find this is helpful don't forget to leave a comment. Because your comments always encourage me!

Saturday, April 7, 2012

Android Web service Access Tutorial

Updated tutorial for new versions >> http://codeoncloud.blogspot.com/2013/06/android-java-soap-web-service-access.html

This simple example demonstrates how we can access a java web service  from Android application.
We can't connect Android 3.0 and after versions to the internet in the main thread. So we have to start new thread. In this tutorial I'm going to demonstrate how we can access a simple java web service  by starting new thread. I have tested this on Android 4.0.3 platform.

Following is the sample java code for web service class. Deploy this web service on Tomcat server at local host. To implement this web service follow these posts.
1. Create java web service in Eclipse using Axis2 (Part 01)
2. Create java web service in Eclipse using Axis2 (Part 02) 

package com.android.ws;
public class PrintMsg {
 public String sayHello(){
           return "Hello Chathura";
        }
}
Here is the code for Android application to invoke deployed web service.
import org.ksoap2.SoapEnvelope;
import org.ksoap2.serialization.SoapObject;
import org.ksoap2.serialization.SoapPrimitive;
import org.ksoap2.serialization.SoapSerializationEnvelope;
import org.ksoap2.transport.HttpTransportSE;
 
import android.widget.TextView;
import android.app.Activity;
import android.os.Bundle;
 
public class AndroidWSClientActivity extends Activity {
  
    private static final String SOAP_ACTION = "http://ws.android.com/sayHello";
    private static final String METHOD_NAME = "sayHello";
    private static final String NAMESPACE = "http://ws.android.com/";
    private static final String URL = "http://175.157.229.119:8080/AndroidWSTest/services/PrintMsg?wsdl";
    /** Called when the activity is first created. */
    @Override
    public void onCreate(Bundle savedInstanceState) {
    super.onCreate(savedInstanceState);
    setContentView(R.layout.main);
      
    Thread networkThread = new Thread() {
    @Override
    public void run() {
      try {
         SoapObject request = new SoapObject(NAMESPACE, METHOD_NAME);         
         SoapSerializationEnvelope envelope = new SoapSerializationEnvelope(SoapEnvelope.VER11);
         envelope.setOutputSoapObject(request);
          
         HttpTransportSE ht = new HttpTransportSE(URL);
         ht.call(SOAP_ACTION, envelope);
         final  SoapPrimitive response = (SoapPrimitive)envelope.getResponse();
         final String str = response.toString();
 
         runOnUiThread (new Runnable(){ 
     public void run() {
         TextView result;
         result = (TextView)findViewById(R.id.textView1);//Text view id is textView1
         result.setText(str);
           }
       });
      }
     catch (Exception e) {
         e.printStackTrace();
     }
    }
  };
  networkThread.start();
  }
 }
}

Note:
SOAP_ACTION in line 13 is "NAMESPACE/METHOD_NAME".

METHOD_NAME
in line 14 is WSDL operation. You can find something like <wsdl:operation name="sayHello"> in your WSDL sayHello is METHOD_NAME here.

NAMESPACE in line 15 is targetNamespace in the WSDL. Replace that & add a "/" to the end .

URL in line 16 The URL of WSDL file. In my case it is http://175.157.229.119:8080
/AndroidWSTest/services/PrintMsg?wsdl
blue colored is the ip of the server replace it with your ip & red colored is the port number.

Make appropriate changes according to your WSDL. I think it is easy to find those things if you open WSDL from a web browser. For more details look the image :


Add Internet permission to Androidanifest.xml file.(Look highlighted line)


}


Run the application using Emulator.
Result :


You can download updated project here here
Password :cloud

 
If you find this post helpful don't forget to leave a comment. Your comments always encourage me!

Friday, April 6, 2012

Hibernate Beginners Tutorial

This simple tutorial specially for beginners of Hibernate and who are planing to use NetBeans IDE for their Hibernate project.
Hibernate is an object-relational mapping (ORM) library for the Java language. In this tutorial I'm going to illustrate how we can easily map java objects with relational database using Hibernate. I have used NetBeans IDE for this task because complete version of NetBeans comes with all the tools needed. No additional downloads. First you need to download NetBeans and MySQL server
Download NetBeans (Download NetBeans bundle with all packs)
Download MySQL Server (Note : You can also use WAMP Server or any other server environment with MySQL if you like)

To complete this tutorial we need MySQL server & NetBeans installed. I have used MySQL server 5.5 & NetBeans 7.1.

First we have to create a database. I have a simple MySQL database with single table. I'm going to use that database for the tutorial.
Here are the codes for create the database. You can use this database or your own database.

1. Create the database
CREATE DATABASE retailer;

1.1 Create table customers
CREATE TABLE customers(
name varchar(20),
C_ID int NOT NULL AUTO_INCREMENT,
address  varchar(20),
email varchar(50),
PRIMARY KEY(C_ID)
);

2. Creating the java program

2.1. Create new java application.

File > New project > Java > Java Application > Next
Name it as HibernateTest. Then click Finish to create the project.

2.2. Create a POJO class

Hibernate use java classes to map to the relational databases. These classes are called POJO(Plain Old Java Objects) classes. Here we are going to create a POJO class
Right click the package (hibernatetest) & select New > Java Class
Name it as Customer. Click Finish to create the class.(Don't change the main class)
We have to use variables to map with the database columns.

Here is the code for POJO class
package hibernatetest;

/**
 *
 * @author Chathura
 */
public class Customer {
    private String customerName;
    private int customerID;
    private String customerAddress;
    private String customerEmail;

    public void setCustomerAddress(String customerAddress) {
        this.customerAddress = customerAddress;
    }

    public void setCustomerEmail(String customerEmail) {
        this.customerEmail = customerEmail;
    }

    public void setCustomerID(int customerID) {
        this.customerID = customerID;
    }

    public void setCustomerName(String customerName) {
        this.customerName = customerName;
    }

    public String getCustomerAddress() {
        return customerAddress;
    }

    public String getCustomerEmail() {
        return customerEmail;
    }

    public int getCustomerID() {
        return customerID;
    }

    public String getCustomerName() {
        return customerName;
    }
}

To generate getters and setters easily in NetBeans, right click on the code and  select Insert Code Then choose Getter... or Setter...

Variable customerName will map with the name column of the customers table.
Variable customerID will map with the C_ID column of the customers table. It is integer & auto incremented. So POJO class variable also should be int.
Variable customerAddress will map with the address column of the customers table.
Variable customerEmail will map with the email column of the customers table.

Then we have to connect to the database we have already created. In my case it is retailer.
(Before doing this we have to connect NetBeans with MySQL)
(Afret connecting NetBeans with MySQL start the server.)

Select Services tab lying next to the Projects tab.
Expand Databases. Expand MySQL Server. There we can see the all databases on MySQL sever


Right click the database retailer. Select Connect...

3. Creating the configuration XML

Hibernate need a configuration file to create the connection.
Right click package hibernatetest select New > Other > Hibernate > Hibernate Configuration Wizard  Click Next
In next window click the drop down menu of Database Connection and select retailer database connection.


Click Finish to create the file.

Here is the complete code for configuration file.


    com.mysql.jdbc.Driver
    jdbc:mysql://localhost:3306/retailer
    root
    chathura
    10
    org.hibernate.dialect.MySQLDialect
    thread
    org.hibernate.cache.NoCacheProvider
    true
    update


Highlighted lines 5 and 6 configure the database password and username. Replace those properties according to your database.
Line 13 :
<mapping resource="customersmapping.hbm.xml"/>
My configuration and mapping documents are in the same package. If they are not in the same package we have to use packagename.mapping document name.hbm.xml

4. Creating the mapping file

Mapping file will map relevant java object with relevant database table column.
Right click project select New > Other > Hibernate > Hibernate Mapping Wizard  click Next name it as customersmapping.hbm click Next
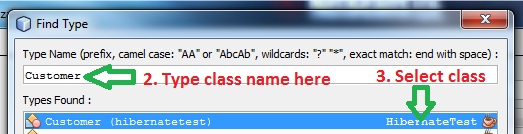
Next window we have to select Class to Map and Database Table.

Select a class to map


After selecting correct class click OK

Select Database Table
Click drop down list and select the table you want to map.
Code for mapping file.


Here
Line 2 :
<class name="hibernatetest.Customer" table="customers">

class name = packagename.classname
table = table we are going to map with java class
Line 3 & 4 :
<id column="C_ID" name="customerID" type="int">
  <generator class="native">

id column = primary key column of the table
name = variable name of the POJO class which maps with the primary key of the table
type = type of the primary key
generator class = if you are using auto increment primary key use "native" other vice it should be "assigned"
Line 6 & 7 :
<property name="customerName">
  <column name="name">

property name = variable name of the POJO class
column name = database column that maps with previous variable

To populate the database you can use this sample code.
package hibernatetest;

import org.hibernate.Session;
import org.hibernate.SessionFactory;

/**
 *
 * @author Chathura
 */
public class HibernateTest {

    /**
     * @param args the command line arguments
     */
    public static void main(String[] args) {
        Session session = null;
    try{
        SessionFactory sessionFactory = new org.hibernate.cfg.Configuration().configure().buildSessionFactory();
        session =sessionFactory.openSession();
        session.beginTransaction();
        
        System.out.println("Populating the database !");
        Customer customer = new Customer();
        customer.setCustomerName("Chathura");
        customer.setCustomerAddress("221B,Moratuwa");
        customer.setCustomerEmail("priyankarahac@gmail.com");
        
        session.save(customer);
        session.getTransaction().commit();
        
        System.out.println("Done!");
        }
    
    catch(Exception e){
        System.out.println(e.getMessage());
    }
 
  finally{
    session.flush();
    session.close();
  }
 }
}

Part of the output.


To retreave values we have to use HQL statements.
Here is a sample code for retrieve values from the table where customer id  = 2
package hibernatetest;

import java.util.Iterator;
import org.hibernate.Session;
import org.hibernate.SessionFactory;

/**
 *
 * @author Chathura
 */
public class HibernateTest {

    /**
     * @param args the command line arguments
     */
    public static void main(String[] args) {
        Session session = null;
    try{
        SessionFactory sessionFactory = new org.hibernate.cfg.Configuration().configure().buildSessionFactory();
        session =sessionFactory.openSession();
        session.beginTransaction();
   
        String HQL_QUERY ="from Customer customers where customers.customerID = :customerId";
        org.hibernate.Query query = session.createQuery(HQL_QUERY);
        //Prepared statement
        query.setParameter("customerId",2);
        System.out.println("Reading values");
         for(Iterator it=query.iterate();it.hasNext();){
             Customer customer = (Customer) it.next();
             System.out.println(customer.getCustomerName());
             System.out.println(customer.getCustomerAddress());
             System.out.println(customer.getCustomerEmail());
             System.out.println(customer.getCustomerID());
             
            }
        session.getTransaction().commit();
        System.out.println("Done!");
        }
    
    catch(Exception e){
        System.out.println(e.getMessage());
    }
 
  finally{
    session.flush();
    session.close();
  }
 }
}
Line 23 :
String HQL_QUERY ="from Customer customers where customers.customerID = :customerId";

Customer = class name
customers = table name
customers.customerID = table name.javavariable name

Result :


You can download sample project here
Password : hibernatetest

If you find this post helpful don't forget to leave a comment. Your comments always encourage me to write more!

Thursday, April 5, 2012

Android Web Service Access Tutorial

Updated tutorial for new versions >> http://codeoncloud.blogspot.com/2013/06/android-java-soap-web-service-access.html

In this tutorial I'm going to demonstrate how we can access a java web service in Android application using ksoap2 library. This Android application also passes parameters to the web service.

First we have to create a web service & deploy it on Tomcat server.
Here is the sample code of java web service  I'm going to access.

package com.testprops.ws;

public class TestPropts {
 public String testMyProps(String fname,String lname){
  return "First Name : "+fname+" Last Name : "+lname;
 }
}

Android application will pass parameters for fname & lname variables.
To create web service refer my these tutorials.
1. Create java web service in Eclipse using Axis2 (Part 01) 
2. Create java web service in Eclipse using Axis2 (Part 02) 

Following is the code for the Android application which invoke the web service. You have to use ksoap2 (You can download ksoap2 from here:::http://code.google.com/p/ksoap2-android/wiki/HowToUse?tm=2) library for this implementation. Read my comments carefully

package com.sendproperties.ws;

import org.ksoap2.SoapEnvelope;
import org.ksoap2.serialization.PropertyInfo;
import org.ksoap2.serialization.SoapObject;
import org.ksoap2.serialization.SoapPrimitive;
import org.ksoap2.serialization.SoapSerializationEnvelope;
import org.ksoap2.transport.HttpTransportSE;
import android.app.Activity;
import android.os.Bundle;

import android.widget.TextView;

public class SendValuesActivity extends Activity {
    private final String NAMESPACE = "http://ws.testprops.com";
    private final String URL = "http://175.157.143.117:8085/TestProperties/services/TestPropts?wsdl";
    private final String SOAP_ACTION = "http://ws.testprops.com/testMyProps";
    private final String METHOD_NAME = "testMyProps";
    /** Called when the activity is first created. */
    @Override
    public void onCreate(Bundle savedInstanceState) {
        super.onCreate(savedInstanceState);
        setContentView(R.layout.main);
        
        SoapObject request = new SoapObject(NAMESPACE, METHOD_NAME); 
        
        String firstName = "Android";
        String lastName = "Program";
        
      //Pass value for fname variable of the web service
        PropertyInfo fnameProp =new PropertyInfo();
        fnameProp.setName("fname");//Define the variable name in the web service method
        fnameProp.setValue(firstName);//Define value for fname variable
        fnameProp.setType(String.class);//Define the type of the variable
        request.addProperty(fnameProp);//Pass properties to the variable
     
      //Pass value for lname variable of the web service
        PropertyInfo lnameProp =new PropertyInfo();
        lnameProp.setName("lname");
        lnameProp.setValue(lastName);
        lnameProp.setType(String.class);
        request.addProperty(lnameProp);
        
        SoapSerializationEnvelope envelope = new SoapSerializationEnvelope(SoapEnvelope.VER11);
        envelope.setOutputSoapObject(request);
        HttpTransportSE androidHttpTransport = new HttpTransportSE(URL);
        
        try {
            androidHttpTransport.call(SOAP_ACTION, envelope);
            SoapPrimitive response = (SoapPrimitive)envelope.getResponse();
           
     
            TextView tv = new TextView(this);
            tv.setText(response.toString());
            setContentView(tv);
  
        } catch (Exception e) {
            e.printStackTrace();
        }
    }
 }

You can find complete information about the implementation of Android application from these two posts.
1. Create java web service in Eclipse using Axis2 (Part 01) 
2. Create java web service in Eclipse using Axis2 (Part 02) 


Change these things in your Android program according to your web service

NAMESPACE
in line 15 is targetNamespace in the WSDL.

URL in line 16 The URL of WSDL file. In my case it is " http://175.157.143.117:8085/TestProperties/services/TestPropts?wsdl"
blue colored is the ip of the server replace it with your ip & red colored is the port number.

SOAP_ACTION in line 17 is "NAMESPACE/METHOD_NAME"

METHOD_NAME
in line 18 is WSDL operation. You can find something like <wsdl:operation name="............."> in your WSDL.


Make appropriate changes according to your WSDL. Open your WSDL using Firefox or Chrome. Then you can easily find those values from the WSDL.
We have to add internet permission to the Android Manifest. After adding permission your Manifest should like follows.


Here is the final result


You can download sample projects:
Click here to download web service project
Click here to download Android project

If you find this post helpful don't forget to leave a comment. your comments encourage me to write!