Sunday, August 24, 2014

How to find the Greatest common divisor of an integer array in java

In this post I'm going to illustrate very simple algorithm to find the Greatest Common Divisor (GCD)  of set of integers (an array) using java.

  • In this algorithm we first find the smallest integer in the int array. 
  • Then we get the modulus for each element in the numbers of the array by dividing smallest integer and add all those modulus together. 
  • After processing each element in the array we check if the total of modulus is equals to 0.  If it is equal to 0 then the GCD is  current smallest value if that total is not equals 0 we deduct 1 from the previous smallest value and do the same computation. 
  • The algorithm will continue with  the same operations until total of modulus becomes 0 or until smallest integer is 2.
  • If there is any GCD, algorithm will return it or otherwise it will return -1.

See the following implementation of the algorithm.


public class GCD {

    public static int findGcd(int... numbers) {

        //Find the smallest integer in the number list
        
        int smallest = numbers[0];

        for (int i = 1; i < numbers.length; i++) {
            if (numbers[i] < smallest) {
                smallest = numbers[i];
            }
        }

        //Find the GCD
        while (smallest > 1) {
            
            int counter = 0;
            int modTot = 0;
            
            while (counter < numbers.length) {

                modTot += numbers[counter] % smallest;
                counter++;

            }

            if (modTot == 0) {
                //Return the gcd if any
                return smallest;
            }

            //System.out.print(" "+ smallest);
            smallest--;

        }
        //return -1 if there is no gcd
        return -1;
    }

    public static void main(String[] x) {
        System.out.println("The GCD of 15 18 42 108 : "+GCD.findGcd(new int[]{15, 18, 42,108}));
    }
}

Here is the output for 15, 18, 42 and 108


Here is the output for 3,7 and 12


Sunday, June 15, 2014

Android TCP/IP client-server socket program (part two)

This is the second part of the post. In this part I will describe the implementation of the TCP/IP Android client program. I tested these two programs by connecting two Android devices over a Wi-Fi network. The deice which host the Wi-Fi hotspot has the server program. Then I connected another Android device which has the client program to that Wi-Fi hotspot. If you want to create the server program first check this post.
Client program has one Activity and one layout. You can download the complete client program from here.

Demo of the client application.
Here is the code for client main activity : 

package com.codeoncloud.androidclient;

import java.io.BufferedReader;
import java.io.IOException;
import java.io.InputStream;
import java.io.InputStreamReader;
import java.io.PrintWriter;
import java.net.Socket;
import java.net.UnknownHostException;
import android.support.v7.app.ActionBarActivity;
import android.os.AsyncTask;
import android.os.Bundle;
import android.view.Menu;
import android.view.MenuItem;
import android.widget.TextView;

public class MainActivity extends ActionBarActivity {
 private TextView tvServerMessage;

 @Override
 protected void onCreate(Bundle savedInstanceState) {
  super.onCreate(savedInstanceState);
  setContentView(R.layout.activity_main);
  tvServerMessage = (TextView) findViewById(R.id.textViewServerMessage);
  //Create an instance of AsyncTask
  ClientAsyncTask clientAST = new ClientAsyncTask();
  //Pass the server ip, port and client message to the AsyncTask
  clientAST.execute(new String[] { "192.168.1.1", "8080","Hello from client" });
 }

 @Override
 public boolean onCreateOptionsMenu(Menu menu) {
  getMenuInflater().inflate(R.menu.main, menu);
  return true;
 }

 @Override
 public boolean onOptionsItemSelected(MenuItem item) {
  int id = item.getItemId();
  if (id == R.id.action_settings) {
   return true;
  }
  return super.onOptionsItemSelected(item);
 }
/**
 * AsyncTask which handles the communication with the server 
 */
 class ClientAsyncTask extends AsyncTask<String, Void, String> {
  @Override
  protected String doInBackground(String... params) {
   String result = null;
   try {
    //Create a client socket and define internet address and the port of the server
    Socket socket = new Socket(params[0],
      Integer.parseInt(params[1]));
    //Get the input stream of the client socket
    InputStream is = socket.getInputStream();
    //Get the output stream of the client socket
    PrintWriter out = new PrintWriter(socket.getOutputStream(),true);
    //Write data to the output stream of the client socket
    out.println(params[2]); 
    //Buffer the data coming from the input stream
    BufferedReader br = new BufferedReader(
      new InputStreamReader(is));
    //Read data in the input buffer
    result = br.readLine();
    //Close the client socket
    socket.close();
   } catch (NumberFormatException e) {
    e.printStackTrace();
   } catch (UnknownHostException e) {
    e.printStackTrace();
   } catch (IOException e) {
    e.printStackTrace();
   }
   return result;
  }
  @Override
  protected void onPostExecute(String s) {
   //Write server message to the text view
   tvServerMessage.setText(s);
  }
 }
}

This activity will involve in three main functions.
1.    Make a request to connect to the server.
2.    Read the input data stream coming from the server.
3.    Send data to the server.

Unlike the server program in the client program all these three tasks will be done by one AsyncTask, here named as ClientAsyncTask. An instance of the AsyncTask will be created and execution of the AsyncTask will be started in the main UI thread of the program [line 26, 28]. The internet address, the port number of and the client message pass as String parameters to the AsyncTask [line 28]. Check with your server application and change the ip address and port.

1.Make a request to connect to the server.
In the AsyncTask first client socket will be created by giving the server ip and port [line 53]. This will make a reaquest to the given server program over the Wi-Fi network since here I connected two devices using Wi-Fi hotspot.

2.Read the input data stream coming from the server.
Input stream of the client socket will be captured [line 57]. Data coming as the stream will be store in a buffer [line 63]. Data in the incoming buffer will be read line by line [line 66] and return the resulting string [line 76].

3.Send data to the server.
This is done using a Printwriter object. First data output stream of the client socket will be captured in to a Printwriter object [line 59]. Then the client message will write in to the print writer [line 61].

After completing client communication the client socket will be closed [line 68]. Then onPostExecute method of the AsyncTask will be executed and the server message will be write in to the text view [line 81].

Here is the code for main activity layout  :

<FrameLayout xmlns:android="http://schemas.android.com/apk/res/android"
    xmlns:tools="http://schemas.android.com/tools"
    android:id="@+id/container"
    android:layout_width="match_parent"
    android:layout_height="match_parent"
    tools:context="com.codeoncloud.androidclient.MainActivity"
    tools:ignore="MergeRootFrame" >

    <LinearLayout
        android:layout_width="match_parent"
        android:layout_height="match_parent"
        android:layout_margin="25dp"
        android:orientation="horizontal" >

        <TextView
            android:id="@+id/textViewsrvrMsg"
            android:layout_width="100dp"
            android:layout_height="wrap_content"
            android:text="Server msg"
            android:textAppearance="?android:attr/textAppearanceMedium" />

        <TextView
            android:id="@+id/textView2"
            android:layout_width="wrap_content"
            android:layout_height="wrap_content"
            android:text=":"
            android:textAppearance="?android:attr/textAppearanceMedium" />

        <TextView
            android:id="@+id/textViewServerMessage"
            android:layout_width="150dp"
            android:layout_height="wrap_content"
            android:textAppearance="?android:attr/textAppearanceMedium" />
    </LinearLayout>

</FrameLayout>

To perform network related functions we have to grant few permissions from Manifest file.
i.e.
 <uses-permission android:name="android.permission.INTERNET" />
 <uses-permission android:name="android.permission.ACCESS_WIFI_STATE" />
 <uses-permission android:name="android.permission.ACCESS_NETWORK_STATE" />
 <uses-permission android:name="android.permission.CHANGE_WIFI_STATE" />
The manifest file after adding all the permissions.

<?xml version="1.0" encoding="utf-8"?>
<manifest xmlns:android="http://schemas.android.com/apk/res/android"
    package="com.codeoncloud.androidclient"
    android:versionCode="1"
    android:versionName="1.0" >

    <uses-sdk
        android:minSdkVersion="8"
        android:targetSdkVersion="19" />

    <uses-permission android:name="android.permission.INTERNET" />
    <uses-permission android:name="android.permission.ACCESS_WIFI_STATE" />
    <uses-permission android:name="android.permission.ACCESS_NETWORK_STATE" />
    <uses-permission android:name="android.permission.CHANGE_WIFI_STATE" />

    <application
        android:allowBackup="true"
        android:icon="@drawable/ic_launcher"
        android:label="@string/app_name"
        android:theme="@style/AppTheme" >
        <activity
            android:name="com.codeoncloud.androidclient.MainActivity"
            android:label="@string/app_name" >
            <intent-filter>
                <action android:name="android.intent.action.MAIN" />

                <category android:name="android.intent.category.LAUNCHER" />
            </intent-filter>
        </activity>
    </application>

</manifest>

I have tested the server and client program on two Android devices connected via a Wi-Fi network. When you are testing first run the server application and then run the client application.These two applications has only the essential functionalists to complete a TCP/IP client server communication using plain java sockets. You can add your own functions to improve this program.

Happy coding  :)

Android TCP/IP client-server socket program (part one)

In this post I’m going to illustrate how we can create an Android server program and client program which can communicate via plain java TCP/IP sockets . Here to connect the server and the client I used a Wi-Fi connection.

In the first part of the post I describe the Server program and in the second part I describe the Client program. These two programs are running on two mobile phones which are connected by same Wi-Fi network and communicate each other through java sockets. In my case I created Wi-Fi hotspot using one pone and I ran the server program on that phone. Then I connected another phone to the Wi-Fi host spot and that phone has the client program. 

First let’s see how server program works. Server program has one Activity and one layout. You can download the complete application from here.


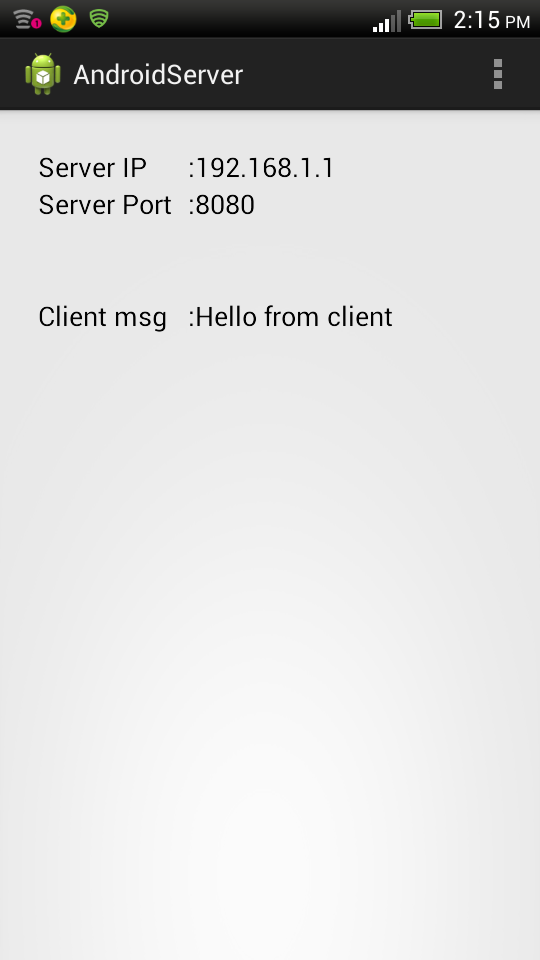
                                                   Quick overview of the server application

Here is the code for the main activity of the server program:

package com.codeoncloud.androidserver;

import java.io.BufferedReader;
import java.io.IOException;
import java.io.InputStream;
import java.io.InputStreamReader;
import java.io.PrintWriter;
import java.net.InetAddress;
import java.net.NetworkInterface;
import java.net.ServerSocket;
import java.net.Socket;
import java.net.SocketException;
import java.util.Enumeration;
import android.support.v7.app.ActionBarActivity;
import android.os.AsyncTask;
import android.os.Bundle;
import android.util.Log;
import android.view.Menu;
import android.view.MenuItem;
import android.widget.TextView;

public class MainActivity extends ActionBarActivity {
 private TextView tvClientMsg,tvServerIP,tvServerPort;
 private final int SERVER_PORT = 8080; //Define the server port
 @Override
 protected void onCreate(Bundle savedInstanceState) {
  super.onCreate(savedInstanceState);
  setContentView(R.layout.activity_main);
  
  tvClientMsg = (TextView) findViewById(R.id.textViewClientMessage);
  tvServerIP = (TextView) findViewById(R.id.textViewServerIP);
  tvServerPort = (TextView) findViewById(R.id.textViewServerPort);
  tvServerPort.setText(Integer.toString(SERVER_PORT));
  //Call method
  getDeviceIpAddress();
  //New thread to listen to incoming connections
  new Thread(new Runnable() {

   @Override
   public void run() {
    try {
     //Create a server socket object and bind it to a port
     ServerSocket socServer = new ServerSocket(SERVER_PORT);
     //Create server side client socket reference
     Socket socClient = null;
     //Infinite loop will listen for client requests to connect
     while (true) {
      //Accept the client connection and hand over communication to server side client socket
      socClient = socServer.accept();
      //For each client new instance of AsyncTask will be created
      ServerAsyncTask serverAsyncTask = new ServerAsyncTask();
      //Start the AsyncTask execution 
      //Accepted client socket object will pass as the parameter
      serverAsyncTask.execute(new Socket[] {socClient});
     }
    } catch (IOException e) {
     e.printStackTrace();
    }
   }
  }).start();
 }
/**
 * Get ip address of the device 
 */
 public void getDeviceIpAddress() {
  try {
   //Loop through all the network interface devices
   for (Enumeration<NetworkInterface> enumeration = NetworkInterface
     .getNetworkInterfaces(); enumeration.hasMoreElements();) {
    NetworkInterface networkInterface = enumeration.nextElement();
    //Loop through all the ip addresses of the network interface devices
    for (Enumeration<InetAddress> enumerationIpAddr = networkInterface.getInetAddresses(); enumerationIpAddr.hasMoreElements();) {
     InetAddress inetAddress = enumerationIpAddr.nextElement();
     //Filter out loopback address and other irrelevant ip addresses 
     if (!inetAddress.isLoopbackAddress() && inetAddress.getAddress().length == 4) {
      //Print the device ip address in to the text view 
      tvServerIP.setText(inetAddress.getHostAddress());
     }
    }
   }
  } catch (SocketException e) {
   Log.e("ERROR:", e.toString());
  }
 }

 @Override
 public boolean onCreateOptionsMenu(Menu menu) {
  getMenuInflater().inflate(R.menu.main, menu);
  return true;
 }

 @Override
 public boolean onOptionsItemSelected(MenuItem item) {
  int id = item.getItemId();
  if (id == R.id.action_settings) {
   return true;
  }
  return super.onOptionsItemSelected(item);
 }
/**
 * AsyncTask which handles the commiunication with clients
 */
 class ServerAsyncTask extends AsyncTask<Socket, Void, String> {
  //Background task which serve for the client
  @Override
  protected String doInBackground(Socket... params) {
   String result = null;
   //Get the accepted socket object 
   Socket mySocket = params[0];
   try {
    //Get the data input stream comming from the client 
    InputStream is = mySocket.getInputStream();
    //Get the output stream to the client
    PrintWriter out = new PrintWriter(
      mySocket.getOutputStream(), true);
    //Write data to the data output stream
    out.println("Hello from server");
    //Buffer the data input stream
    BufferedReader br = new BufferedReader(
      new InputStreamReader(is));
    //Read the contents of the data buffer
    result = br.readLine();
    //Close the client connection
    mySocket.close();
   } catch (IOException e) {
    e.printStackTrace();
   }
   return result;
  }

  @Override
  protected void onPostExecute(String s) {
   //After finishing the execution of background task data will be write the text view
   tvClientMsg.setText(s);
  }
 }
}

Basically server program involves in three main functions.
1. Get the device IP address and print it 
2.  Listen for client connections 
3. Send a message to the client and get a message from the client

1. Get the device IP and print it.
For the client program we need to know the server ip address and port to connect the client with the server. So I use getDeviceIpAddress [line 65 to 84] method to get the ip address of the device which acts as the server

2. Listen for client connections.
The second main function of the server program is listening to the assigned port for client connection requests. To do this I created separate thread [line 37]. This thread will be started from the ui thread and in this thread, an infinite while loop [line 47] is used to listen for client requests. Because of the infinite loop this can serve for multiple client connections. Whiting this thread ServerSocket object will be created and that will bind to the assigned port (8080) [line 43]. You can use your own port number. When client connection is accepted server side client socket object will be created [line 49] and an instance of AsyncTask is also created [line 52]. Then the communication with this client will be handover to the AsyncTask by passing newly created client socket object to the AsyncTask [line 54]. For each accepted connection new AsyncTask object will be created. After starting the execution of the AsyncTask the thread will available to accept new client connections.

3. Send message to the client and get message from the client.
This is about handling the communication with a client. Communication part will be done by the AsyncTask,  ServerAsyncTask. In the background process of the AsyncTask first another client object reference mySocket will be created and that reference will use to refer to the server side client object previously created socClient. Data input stream from the client will be get and data which is sending from the client will be read by using the input stream [line 112,119,122]. To send data to the client a data output stream will be opened [line 114] and data that needed to be send to the client will be write in to the output stream using the printwriter object created [line 117]. After finishing the execution of background task in the onPostExecute method the message sent by the client will be print in to the text view [line 134].
Note that to run the server program first create Wi-Fi hotspot from your device which is going to use as the server device and then run the server program on that device. After running the server program you can see the ip address and the port number of the server.

Here is the code of ActivityMain layout :


<FrameLayout xmlns:android="http://schemas.android.com/apk/res/android"
    xmlns:tools="http://schemas.android.com/tools"
    android:id="@+id/container"
    android:layout_width="match_parent"
    android:layout_height="match_parent"
    tools:context="com.codeoncloud.androidserver02.MainActivity"
    tools:ignore="MergeRootFrame" >

    <LinearLayout
        android:layout_width="match_parent"
        android:layout_height="match_parent"
        android:layout_margin="25dp"
        android:orientation="vertical" >

        <LinearLayout
            android:layout_width="match_parent"
            android:layout_height="wrap_content"
            android:orientation="horizontal" >

            <TextView
                android:id="@+id/textViewSrvrIP"
                android:layout_width="100dp"
                android:layout_height="wrap_content"
                android:text="Server IP"
                android:textAppearance="?android:attr/textAppearanceMedium" />

            <TextView
                android:id="@+id/textViewSrvrIP1"
                android:layout_width="wrap_content"
                android:layout_height="wrap_content"
                android:text=":"
                android:textAppearance="?android:attr/textAppearanceMedium" />

            <TextView
                android:id="@+id/textViewServerIP"
                android:layout_width="wrap_content"
                android:layout_height="wrap_content"
                android:textAppearance="?android:attr/textAppearanceMedium" />
        </LinearLayout>

        <LinearLayout
            android:layout_width="match_parent"
            android:layout_height="wrap_content"
            android:layout_marginBottom="50dp"
            android:orientation="horizontal" >

            <TextView
                android:id="@+id/textViewSrvrPort"
                android:layout_width="100dp"
                android:layout_height="wrap_content"
                android:text="Server Port"
                android:textAppearance="?android:attr/textAppearanceMedium" />

            <TextView
                android:id="@+id/textViewSrvrPort1"
                android:layout_width="wrap_content"
                android:layout_height="wrap_content"
                android:text=":"
                android:textAppearance="?android:attr/textAppearanceMedium" />

            <TextView
                android:id="@+id/textViewServerPort"
                android:layout_width="wrap_content"
                android:layout_height="wrap_content"
                android:textAppearance="?android:attr/textAppearanceMedium" />
        </LinearLayout>

        <LinearLayout
            android:layout_width="match_parent"
            android:layout_height="wrap_content"
            android:layout_marginBottom="50dp"
            android:orientation="horizontal" >

            <TextView
                android:id="@+id/textViewClMsg"
                android:layout_width="100dp"
                android:layout_height="wrap_content"
                android:text="Client msg"
                android:textAppearance="?android:attr/textAppearanceMedium" />

            <TextView
                android:id="@+id/textViewClMsg1"
                android:layout_width="wrap_content"
                android:layout_height="wrap_content"
                android:text=":"
                android:textAppearance="?android:attr/textAppearanceMedium" />

            <TextView
                android:id="@+id/textViewClientMessage"
                android:layout_width="wrap_content"
                android:layout_height="wrap_content"
                android:layout_marginBottom="20dp"
                android:textAppearance="?android:attr/textAppearanceMedium" />
        </LinearLayout>
    </LinearLayout>

</FrameLayout>
In order to access certain network functionalists we have to give few uses permissions in Manifest file. i.e
 <uses-permission android:name="android.permission.INTERNET" />
 <uses-permission android:name="android.permission.ACCESS_WIFI_STATE" />
 <uses-permission android:name="android.permission.ACCESS_NETWORK_STATE" />
 <uses-permission android:name="android.permission.CHANGE_WIFI_STATE" />

Here is the Manifest file after adding all the permissins.

<?xml version="1.0" encoding="utf-8"?>
<manifest xmlns:android="http://schemas.android.com/apk/res/android"
    package="com.codeoncloud.androidserver"
    android:versionCode="1"
    android:versionName="1.0" >

    <uses-sdk
        android:minSdkVersion="8"
        android:targetSdkVersion="19" />

    <uses-permission android:name="android.permission.INTERNET" />
    <uses-permission android:name="android.permission.ACCESS_WIFI_STATE" />
    <uses-permission android:name="android.permission.ACCESS_NETWORK_STATE" />
    <uses-permission android:name="android.permission.CHANGE_WIFI_STATE" />

    <application
        android:allowBackup="true"
        android:icon="@drawable/ic_launcher"
        android:label="@string/app_name"
        android:theme="@style/AppTheme" >
        <activity
            android:name="com.codeoncloud.androidserver.MainActivity"
            android:label="@string/app_name" >
            <intent-filter>
                <action android:name="android.intent.action.MAIN" />

                <category android:name="android.intent.category.LAUNCHER" />
            </intent-filter>
        </activity>
    </application>

</manifest>

Note that to run the server program first create Wi-Fi hotspot from your device which is going to use as the server device and then run the server program on that device. After running the server program you can see the ip address and the port number of the server. In the next part of this application I describe the implementation of the client application. 

Happy coding :)