To create the project
WSO2 Developer Studio 3.2.1, java 1.6 and
JAX-RS (With
Apache CXF) is used. To deploy the RESTful web service
WSO2 Application Server 5.2.1 is used.
This tutorial covers following areas.
1. Crate a simple CRUD (Create, Read, Update, Delete) RESTful web service using WSO2 Developer studio. (I have used simple Task list web service)
2. Deploying the web service in WSO2 Application Server.
3. Testing the web service using SoapUI.
4. Crete a client to consume the web service.
Contents.
1. Prerequisites.
2. Create RESTful web service using WSO2 Developer studio.
3. Deploy the web service in WSO2 Application server.
4. Testing services using SoapUI
5. Create a client program.
6. Source code
7. References
1. Prerequisites
1.1. Jdk 1.6 or 1.7 (Set environmental variables)
1.2. WSO2 developer studio
If you don't have WSO2 Developer Studio just go and download it from the following link.
http://wso2.com/products/developer-studio/
It is 100% open source. It has the built in support for CXF web services. No additional libraries or configurations needed. This IDE is based on Eclipse so you can easily use it.
After downloading the studio if you are using Linux or Mac operating system in a terminal cd inside to the eclipse folder and execute the following command to grant permissions.
chmod +x eclipse
After executing this you can run the IDE by double clicking the Eclipse.
You can find more information about running the WSO2 Developer Studio form the following page.
https://docs.wso2.com/display/DVS371/Installation
1.3. WSO2 Application Server
To deploy the RESTful web service WSO2 Application server is used. If you don't have the server, download it from the following link. And extract it.
http://wso2.com/products/application-server/
It is 100% open source. It has integrated CXF engine and it Supports for RESTful services with JAX-RS so we can directly deploy our service.
To run the WSO2 Application Server in the Linux system open a terminal (Ctrl+Alt+T) and cd to bin directory inside the WSO2 Application Server folder and execute the following command. (make sure that you have jdk (1.6 or 1.7) installed and set the environmental variables correctly)
sh wso2server.sh
In a Windows system open command prompt and cd to bin directory inside the WSO2 Application Server folder using command prompt and execute the following command.
wso2server.bat
For more information about installing the WSO2 Application Server refer the following page.
https://docs.wso2.com/display/AS521/Installing+the+Product
1.4 SoapUI
SoapUI is used to test the RESTful web service.
You can download it form the following site.
http://www.soapui.org/
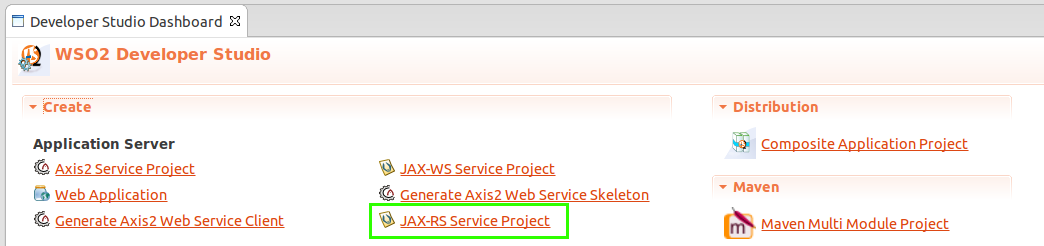
2. Create RESTful web service using WSO2 Developer studio.
2.1 Create JAX-RS Service Project
- Open WSO2 Developer studio.
- Click Developer Studio menu.
- Select Open Dashboard.
- From the Developer Studio Dashboard select JAX-RS service project.
- Select Create New JAX-RS Service.
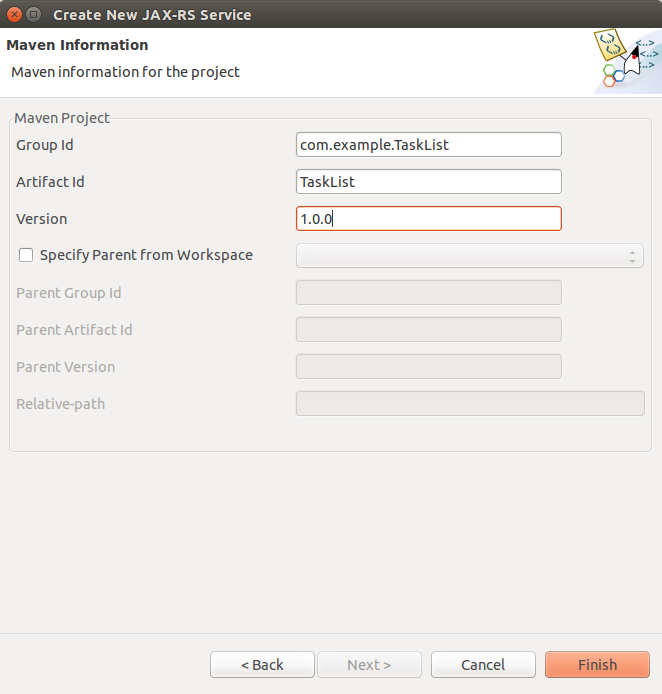
- Give a project name, package name and a class name.
- I gave com.blogspot.codeoncloud.tasklist.resource as the package name and TaskList Resource as the class name.
- Keep other fields as default and click next.
- From the next window you can change the Maven Information. For this I keep all fields as default and click Finish to create the project.
2.1 Create classes.
For this project I use three classes.
2.1.1. Task
2.1.2. TaskHandler
2.1.3. TaskListResource
2.1.1. Task class
This is the domain class and this class defines a Task object.
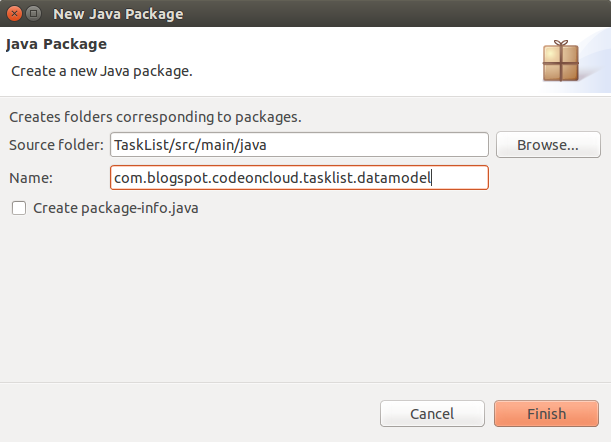
- Create a new package named com.blogspot.codeoncloud.tasklist.datamodel
- To create the package right click on the project and select New >> Package.
- Give the package name click Finish.
- Right click newly created package and select New >> Class to create new class. Give Task as the class name and click Finish.
- Add following code to the Task class.
 1
 2
 3
 4
 5
 6
 7
 8
 9
10
11
12
13
14
15
16
17
18
19
20
21
22
23
24
25
26
27
28
29
30
31
32
33
34 | package com.blogspot.codeoncloud.tasklist.datamodel;
import javax.xml.bind.annotation.XmlRootElement;
@XmlRootElement
public class Task {
private int id;
private String name;
private String description;
public int getId() {
return id;
}
public void setId(int id) {
this.id = id;
}
public String getName() {
return name;
}
public void setName(String name) {
this.name = name;
}
public String getDescription() {
return description;
}
public void setDescription(String description) {
this.description = description;
}
}
|
@XmlRootElement is a JAXB annotation. I will give a brief description about JAXB annotations used in this project.
2.1.2. TaskHandler class
- The TaskHandler class handles operations related to tasks like create, read, update and delete.
- Create another package com.blogspot.codeoncloud.tasklist.datahandler and create TaskHandler class with the following code
 1
 2
 3
 4
 5
 6
 7
 8
 9
10
11
12
13
14
15
16
17
18
19
20
21
22
23
24
25
26
27
28
29
30
31
32
33
34
35
36
37
38
39
40
41
42
43
44
45
46
47
48
49
50
51
52
53
54
55
56
57
58
59
60
61
62
63
64
65
66
67
68
69
70
71
72
73
74
75
76
77
78
79
80
81 | package com.blogspot.codeoncloud.tasklist.datahandler;
import java.util.HashMap;
import java.util.Map;
import com.blogspot.codeoncloud.tasklist.datamodel.Task;
public class TaskHandler {
static TaskHandler taskHandler = null;
Map<Integer, Task> taskList = new HashMap<Integer, Task>();
//Singleton pattern is used to eliminate conflicts
private TaskHandler() {
//Add some dummy data to task list
Task task1 = new Task();
task1.setId(1);
task1.setName("task1");
task1.setDescription("task1 description");
taskList.put(1, task1);
Task task2 = new Task();
task2.setId(2);
task2.setName("task2");
task2.setDescription("task2 description");
taskList.put(2, task2);
}
//Create and return single object
public static TaskHandler getTaskHandler() {
if (taskHandler != null) {
return taskHandler;
} else {
taskHandler = new TaskHandler();
return taskHandler;
}
}
// Returns Task object according to the id
public Task getTaskById(int id) {
return taskList.get(id);
}
// Returns all Task objects
public Map<Integer, Task> getAllTasks() {
return taskList;
}
//Remove task from the list
public boolean deleteTask(int id) {
boolean isDeleted = false;
if (taskList.get(id) != null) {
taskList.remove(id);
isDeleted = true;
}
return isDeleted;
}
//Adding a task with name and id
public boolean addTask(Integer id,String name) {
boolean isAdded = false;
if(taskList.get(id)==null){
Task task = new Task();
task.setId(id);
task.setName(name);
taskList.put(id, task);
isAdded = true;
}
return isAdded;
}
//Update a existing task object with description
public boolean updateTask(int id, String description) {
boolean isUpdated = false;
if (taskList.get(id) != null) {
Task task = taskList.get(id);
task.setDescription(description);
taskList.put(id, task);
isUpdated = true;
}
return isUpdated;
}
}
|
Here I used Singleton pattern to make sure that we create only single object of TaskHandler class. If we create more than one TaskHandler object it will try to put duplicate keys into the hashmap.
2.1.3. TaskListResource class
This class will be used as REST resource.
- Create a package named com.blogspot.codeoncloud.tasklist.resources.
- Create TaskListResource class with the following code.
 1
 2
 3
 4
 5
 6
 7
 8
 9
10
11
12
13
14
15
16
17
18
19
20
21
22
23
24
25
26
27
28
29
30
31
32
33
34
35
36
37
38
39
40
41
42
43
44
45
46
47
48
49
50
51
52
53
54
55
56
57
58
59
60
61
62
63
64
65
66
67
68
69
70 | package com.blogspot.codeoncloud.tasklist.resources;
import java.util.ArrayList;
import java.util.List;
import javax.ws.rs.Consumes;
import javax.ws.rs.DELETE;
import javax.ws.rs.GET;
import javax.ws.rs.POST;
import javax.ws.rs.PUT;
import javax.ws.rs.Path;
import javax.ws.rs.PathParam;
import javax.ws.rs.Produces;
import javax.ws.rs.QueryParam;
import javax.ws.rs.core.MediaType;
import com.blogspot.codeoncloud.tasklist.datahandler.TaskHandler;
import com.blogspot.codeoncloud.tasklist.datamodel.Task;
@Path("/TaskResource")
public class TaskListResource {
// Returns task by id in xml format
@GET
@Path("/GetTaskById/XML/{id}")
@Produces(MediaType.APPLICATION_XML)
@Consumes(MediaType.TEXT_PLAIN)
public Task getById(@PathParam("id") int id) {
TaskHandler taskHandler = TaskHandler.getTaskHandler();
return taskHandler.getTaskById(id);
}
// Returns all tasks in JSON format
@GET
@Path("/GetAllTasks/JSON")
@Produces(MediaType.APPLICATION_JSON)
public List<Task> getAllTaks() {
TaskHandler taskHandler = TaskHandler.getTaskHandler();
// Cannot convert HashMap to JSON
// All objects are casted to ArrayList
return new ArrayList<Task>(taskHandler.getAllTasks().values());
}
// Put new task
@PUT
@Path("/AddTask/{task}")
@Consumes(MediaType.APPLICATION_JSON)
public boolean addTask(Task task) {
TaskHandler taskHandler = TaskHandler.getTaskHandler();
return taskHandler.addTask(task.getId(), task.getName());
}
// Update existing task with a description
@POST
@Path("/UpdateTask/{task}")
@Consumes(MediaType.APPLICATION_XML)
public boolean updateTask(Task task) {
TaskHandler taskHandler = TaskHandler.getTaskHandler();
return taskHandler.updateTask(task.getId(), task.getDescription());
}
// Delete a task by id
@DELETE
@Path("/DeleteTask/{id}")
@Consumes(MediaType.APPLICATION_XML)
public boolean deleteTask(@QueryParam("id")int id) {
TaskHandler taskHandler = TaskHandler.getTaskHandler();
return taskHandler.deleteTask(id);
}
}
|
JAX-RS use JAXB (Java Architecture for XML Binding) annotations to convert JAXB annotated object in to XML and JSON automatically. Here I have used some JAX-RS annotations. You can find the uses of those annotations in the following table.
Now we have completed creating the web service project. After creating all the files you should have a project structure similar to this.
There are two important auto generated xml files. You can find these xml files under TaskList>>src>>main>>webapp>>WEB-INF
cxf-servlet.xml
1
2
3
4
5
6
7
8 | <?xml version="1.0" encoding="UTF-8"?><beans xmlns="http://www.springframework.org/schema/beans" xmlns:xsi="http://www.w3.org/2001/XMLSchema-instance" xmlns:jaxrs="http://cxf.apache.org/jaxrs" xsi:schemaLocation="http://www.springframework.org/schema/beans http://www.springframework.org/schema/beans/spring-beans-2.0.xsd http://cxf.apache.org/bindings/soap http://cxf.apache.org/schemas/configuration/soap.xsd http://cxf.apache.org/jaxrs http://cxf.apache.org/schemas/jaxrs.xsd">
<bean id="TaskListResourceBean" class="com.blogspot.codeoncloud.tasklist.resources.TaskListResource"/>
<jaxrs:server id="TaskListResource" address="/task_list_resource">
<jaxrs:serviceBeans>
<ref bean="TaskListResourceBean"/>
</jaxrs:serviceBeans>
</jaxrs:server>
</beans>
|
web.xml
 1
 2
 3
 4
 5
 6
 7
 8
 9
10
11
12
13
14
15
16
17
18
19
20
21
22
23
24
25 | <?xml version="1.0" encoding="UTF-8"?>
<web-app version="2.5" xmlns="http://java.sun.com/xml/ns/javaee"
xmlns:xsi="http://www.w3.org/2001/XMLSchema-instance"
xsi:schemaLocation="http://java.sun.com/xml/ns/javaee
http://java.sun.com/xml/ns/javaee/web-app_2_5.xsd">
<display-name>cxf</display-name>
<servlet>
<servlet-name>cxf</servlet-name>
<display-name>cxf</display-name>
<description>Apache CXF Endpoint</description>
<servlet-class>org.apache.cxf.transport.servlet.CXFServlet</servlet-class>
<load-on-startup>1</load-on-startup>
</servlet>
<servlet-mapping>
<servlet-name>cxf</servlet-name>
<url-pattern>/services/*</url-pattern>
</servlet-mapping>
<session-config>
<session-timeout>60</session-timeout>
</session-config>
</web-app>
|
I'm not going to change anything of these files.
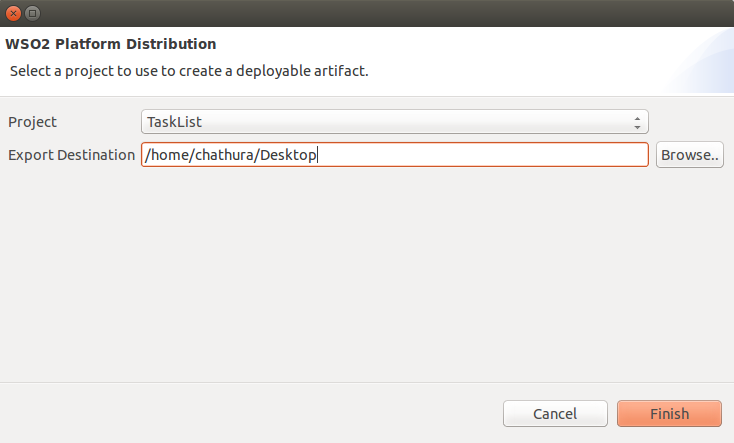
Next we have to export the project as a deployable archive.
WSO2 Developer studio facilitates to export the project as deployable archive.
2.3. Export the project as deployable archive
-
Right click the project and select Export as Deployable Archive option.
Specify an export destination and click finish.
You can find the web service archive (.war) file in the given destination
Eg : TaskList_1.0.0.war
3. Deploy the web service in WSO2 Application server
3.1 Run the server
- Run WSO2 Server as mentioned in the section 1.
- Open
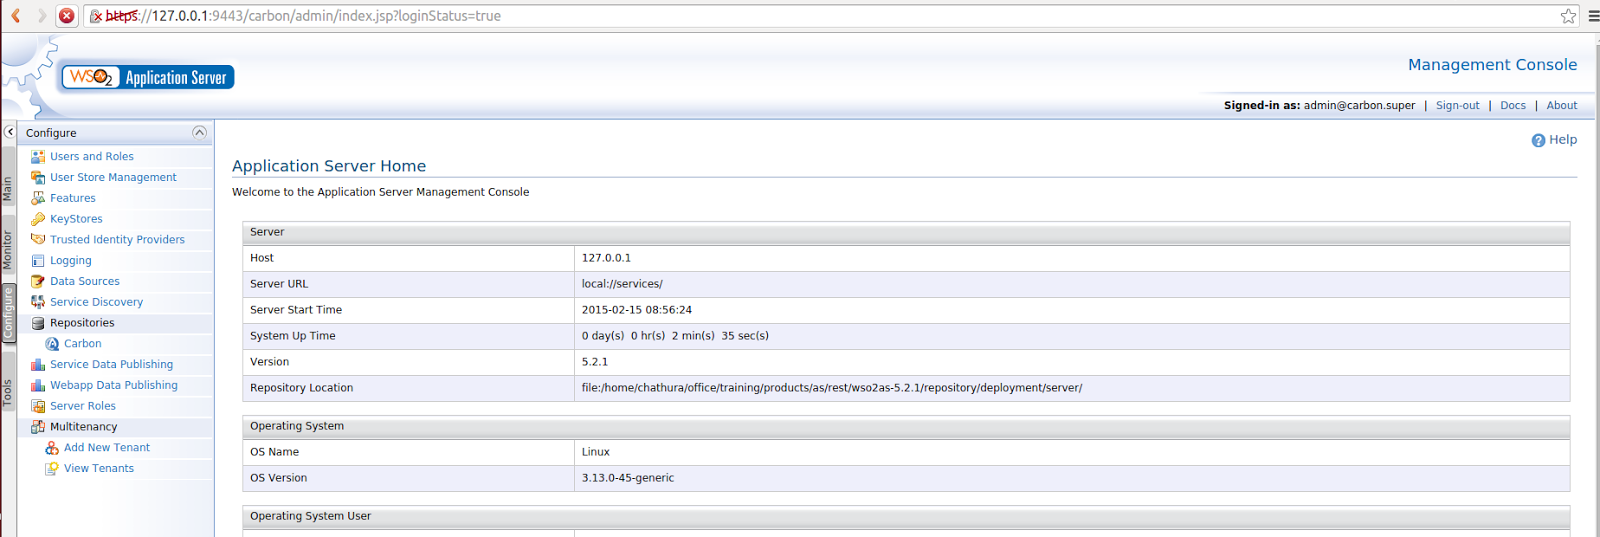
https://127.0.0.1:9443/carbon/ in a web browser to access the management console.
- Login to the server using admin for both username and password.
- You will be able to see the Management Console.
3.2 Upload the web service archive
- To upload the web service to the WSO2 Application Server, select Main tab and Web Applications under Manage >> Applications >>Add.
In the Upload Web Applications section choose war file you exported in the above section and click upload button.
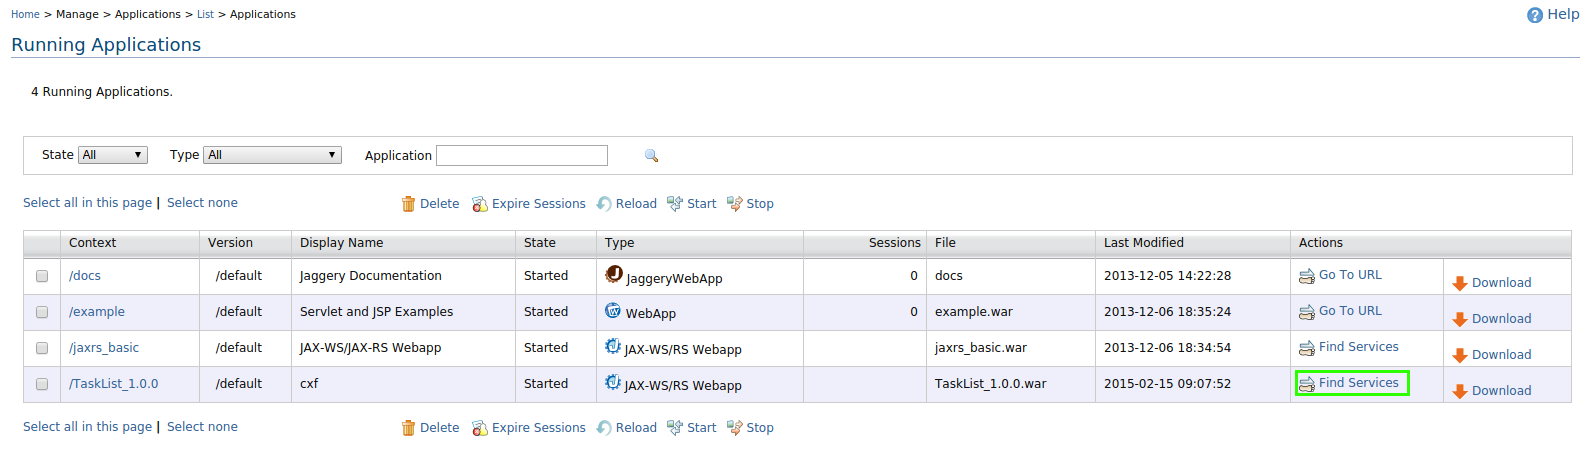
If everything went correct, You will be able to see successfully uploaded message.
After a while you will be able to see deployed web application in the applications list. Click on Find Services under Actions.
3.3 WADL (Web Application Description Language)
After clicking Find Services you can see available RESTful services. You can find the WADL link here. We need this WADL link to test the web service using SoapUI. When you are using Soap UI you can copy WADL link from here.
- Click on the link to open WADL.
4. Test the RESTful web service using SoapUI
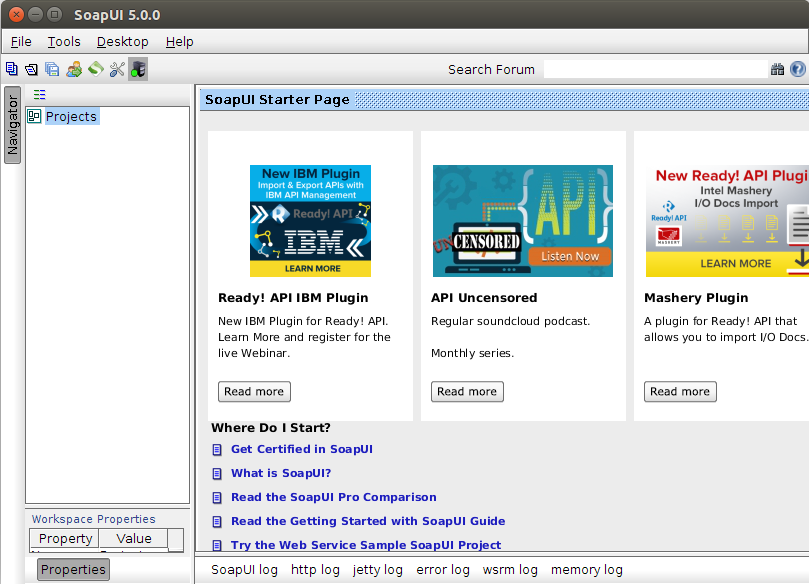
4.1 Run SoapUI
We can test the some functionalities (Get all tasks and Get task by id) of our web service easily using SoapUI.
- Run Soap UI.
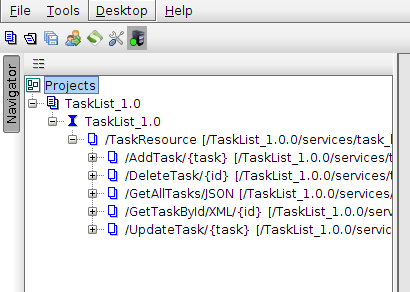
4.2 Create a REST project
- Select File >> New REST Project
- Click on Import WADL
- Paste WADL link here and click OK.
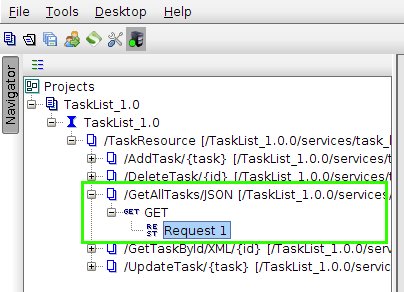
- You will find all the available services under the TaskList_1.0 project.
4.3 Testing services.
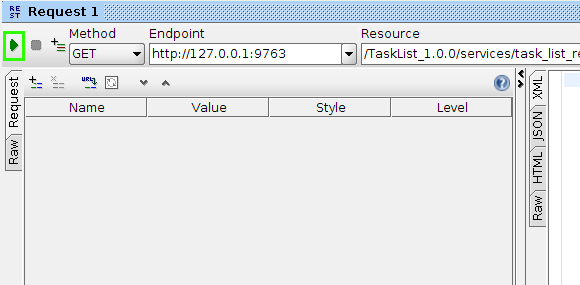
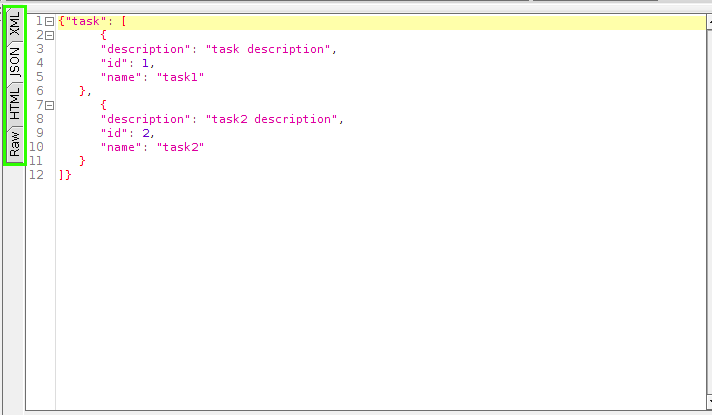
- Expand GetAllTasks and double click on Request 1.
- Click on Submit button.
- You will get an output like this. You can switch between available types from the left side tabs.
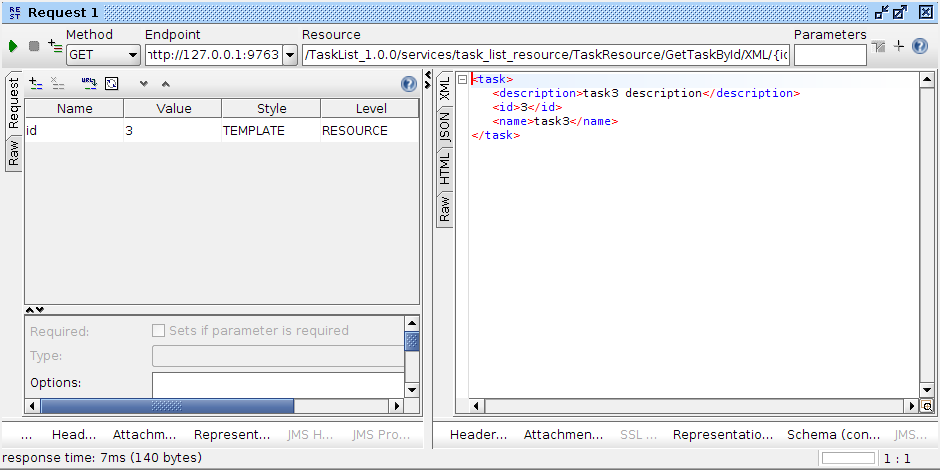
Similarly you can test other services also.
From the left side pane click Request 1 under the service which you want to test.
Give a task id that you want to get details.
5. Create a client program.
There are few ways of implementing client program to consume a RESTful web service using java.
Here I'm using
JAX-RS client API with Apache CXF because it is very straightforward and easy. (If you want you can even generate some code stubs from WSO2 Application Server it self)
This client consumes CURD operations provided by the web service.
To build the client we need to add some additional libraries to the Java class path of the client project.
5.1 Creating the project
- Create a new Java project in WSO2 Developer studio by selecting File >> New >> Other >> Java Project.
- Give project name as TaskListRestClient
- We need to add some aditional jars to the class path.
- Download and extract Apache CXF
http://cxf.apache.org/download.html
- Add all the jars in the apache-cxf-3.0.4 >> lib directory
- You can add jars to the client path of the project in WSO2 Developer Studio as you add jars in Eclipse. If you don't know how to add jars in Eclipse please visit following link.
http://www.wikihow.com/Add-JARs-to-Project-Build-Paths-in-Eclipse-%28Java%29
5.2 Creating classes
5.2.1 Task
5.2.2 TaskListClient
- Create two packages in the project named
com.blogspot.codeoncloud.tasklistrestclient
and
com.blogspot.codeoncloud.tasklistrestclient.datamodel
5.2.1 Task
- Create Task class in com.blogspot.codeoncloud.tasklistrestclient.datamodel package and add following code to that class.
 1
 2
 3
 4
 5
 6
 7
 8
 9
10
11
12
13
14
15
16
17
18
19
20
21
22
23
24
25
26
27
28
29
30
31
32
33
34 | package com.blogspot.codeoncloud.tasklistrestclient.datamodel;
import javax.xml.bind.annotation.XmlRootElement;
@XmlRootElement
public class Task {
private int id;
private String name;
private String description;
public String getDescription() {
return description;
}
public void setDescription(String description) {
this.description = description;
}
public int getId() {
return id;
}
public void setId(int id) {
this.id = id;
}
public String getName() {
return name;
}
public void setName(String name) {
this.name = name;
}
}
|
- This class is used to define task objects.
5.2.2 TaskListClient
- Create TaskListClient class in com.blogspot.codeoncloud.tasklistrestclient package.
- This class act as the RESTful client of TaskList web service.
- Add following code to the TaskListClient class.
 1
 2
 3
 4
 5
 6
 7
 8
 9
10
11
12
13
14
15
16
17
18
19
20
21
22
23
24
25
26
27
28
29
30
31
32
33
34
35
36
37
38
39
40
41
42
43
44
45
46
47
48
49
50
51
52
53
54
55
56
57
58
59
60
61
62
63
64
65
66
67
68
69
70
71
72
73
74
75
76
77
78
79
80
81
82 | package com.blogspot.codeoncloud.tasklistrestclient;
import java.net.URI;
import javax.ws.rs.client.Client;
import javax.ws.rs.client.ClientBuilder;
import javax.ws.rs.client.Entity;
import javax.ws.rs.client.Invocation;
import javax.ws.rs.client.WebTarget;
import javax.ws.rs.core.MediaType;
import javax.ws.rs.core.UriBuilder;
import com.blogspot.codeoncloud.tasklistrestclient.datamodel.Task;
public class TaskListClient {
public static void main(String[] args) {
final URI BASE_URI = UriBuilder.fromUri("http://127.0.0.1:9763/TaskList_1.0.0/services/task_list_resource/TaskResource").build();
// Get all tasks
Client clientgetAll = ClientBuilder.newClient();
WebTarget webTargetgetAll = clientgetAll.target(BASE_URI);
webTargetgetAll = webTargetgetAll.path("/GetAllTasks/JSON");
Invocation.Builder builderGetAll = webTargetgetAll.request();
String allTasks = builderGetAll.get(String.class);
System.out.println("All tasks : " + allTasks);
//Get a task by id
Client clientGetById = ClientBuilder.newClient();
WebTarget webTargetGetById = clientGetById.target(BASE_URI);
webTargetGetById = webTargetGetById.path("/GetTaskById/XML/").path("2");
Invocation.Builder builderGetById = webTargetGetById.request();
String taskFromId = builderGetById.get(String.class);
System.out.println("Task details : "+taskFromId);
//Put new task
Client clientPutTask = ClientBuilder.newClient();
WebTarget webTargetPutTask = clientPutTask.target(BASE_URI);
webTargetPutTask = webTargetPutTask.path("/AddTask/1");
Invocation.Builder builderPutTask = webTargetPutTask.request();
//Create new task object
Task task1 = new Task();
task1.setId(3);
task1.setName("task3");
boolean putStatus = builderPutTask.put(Entity.entity(task1, MediaType.APPLICATION_JSON),Boolean.class);
System.out.println("Put new task : "+putStatus);
//Update existing task
Client clientUpdateTask = ClientBuilder.newClient();
WebTarget webTargetUpdateTask = clientUpdateTask.target(BASE_URI);
webTargetUpdateTask = webTargetUpdateTask.path("/UpdateTask/1");
Invocation.Builder builderUpdateTask = webTargetUpdateTask.request();
//Create new task object
Task task2 = new Task();
task2.setId(3);
task2.setDescription("task3 description");
boolean updateStatus = builderUpdateTask.post(Entity.entity(task2, MediaType.APPLICATION_XML),Boolean.class);
System.out.println("Update task : "+updateStatus);
//Delete a task
Client clientDeleteTask = ClientBuilder.newClient();
WebTarget webTargetDleteTask = clientDeleteTask.target(BASE_URI);
webTargetDleteTask = webTargetDleteTask.path("/DeleteTask/1").queryParam("id", 1);
Invocation.Builder builderDeleteTask = webTargetDleteTask.request();
boolean deleteStatus = builderDeleteTask.delete(Boolean.class);
System.out.println("Delete task : "+deleteStatus);
//Print new task list
Client clientgetNewTasklist = ClientBuilder.newClient();
WebTarget webTargetNewTaskList = clientgetNewTasklist.target(BASE_URI);
webTargetNewTaskList = webTargetNewTaskList.path("/GetAllTasks/JSON");
Invocation.Builder builderNewTaskList = webTargetNewTaskList.request();
String newTasks= builderNewTaskList.get(String.class);
System.out.println("New tasks : "+newTasks);
}
}
|
Here is the output generated by the client.
6. Source code
You can download source codes for both server and client applications from the following link.
http://www.mediafire.com/download/7zeb5cobglghsus/Java_JAX-RS_Codes.zip
Download web service archive (.war) from here
http://www.mediafire.com/download/v81ia6dpgkdn3p8/TaskList_1.0.0.war
7. Reference
http://www.vogella.com/tutorials/REST/article.html#jaxb_client
http://www.informit.com/guides/content.aspx?g=java&seqNum=598
http://en.wikipedia.org/wiki/Java_API_for_RESTful_Web_Services
http://cxf.apache.org/docs/jax-rs-client-api.html#JAX-RSClientAPI-JAX-RS2.0andCXFspecificAPI
Appreciate your comments!


