Tuesday, May 28, 2013

Blackberry (Java) JSON tutorial

This post is about very basic level java implementation of Blackberry and json. I'm going to show how we can read json from URL and display in Blackberry. I'm going to use this URL to get the json response.

Quick demo


In Blackberry we cannot make a HTTP call in main thread, therefore we need to create separate thread to create the HTTP call.

1. First create a Blackberry application and name it as you want and also give a unique package name.

2. Then create a new class that extends Thread class. I named it as "ConnectJson". No matter you can use your own name.


Here is the code for ConnectJson class.

package com.jcode.json;

import java.io.ByteArrayOutputStream;
import java.io.InputStream;
import javax.microedition.io.Connector;
import javax.microedition.io.HttpConnection;
import net.rim.device.api.ui.component.Dialog;

public class ConnectJson extends Thread {
 
 private String url;
 public String response;
 private String myinterface = ";interface=wifi";
 
  public void run() {
         HttpConnection conn = null;
         InputStream in = null;
         int code;
   
   try {
      conn = (HttpConnection) Connector.open(this.url + this.myinterface, Connector.READ);
         conn.setRequestMethod(HttpConnection.GET);
         code = conn.getResponseCode();

         if (code == HttpConnection.HTTP_OK) {
             in = conn.openInputStream();
             ByteArrayOutputStream out = new ByteArrayOutputStream();
             
             byte[] buffer = new byte[in.available()];
             int len = 0;

             while (-1 != (len = in.read(buffer))) {
                 out.write(buffer);                   
             }

             out.flush();
             this.response = new String(out.toByteArray());
            
             if (out != null){
                 out.close();
             }
             if (in != null){
                 in.close();
             }
             if (conn != null){
                 conn.close();
             }
         }

     } catch (Exception e) {
        Dialog.inform(e.toString());
     }
}  

public String jsonResult(String url){
  this.url = url;
  this.start();
  this.run();
  return response;
 }
} 

3. In your screen class extend the JsonConnet class and call the jsonResult method passing the URL.
Here is the code for MyScreen class

package com.jcode.json;

import net.rim.device.api.ui.component.LabelField;
import net.rim.device.api.ui.container.MainScreen;

/**
 * A class extending the MainScreen class, which provides default standard
 * behavior for BlackBerry GUI applications.
 */
public final class MyScreen extends MainScreen
{
    /**
     * Creates a new MyScreen object
     */
    public MyScreen()
    {        
        // Set the displayed title of the screen       
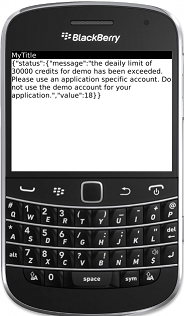
        setTitle("MyTitle");
        
        ConnectJson connectJson = new ConnectJson();
        connectJson.jsonResult("http://api.geonames.org/citiesJSON?north=44.1&south=-9.9&east=-22.4&west=55.2&lang=de&username=demo");
        LabelField jsonResult = new LabelField(connectJson.response);
        add(jsonResult);
    }
}

This is the code of MyApp class no need to change anything there.

package com.jcode.json;

import net.rim.device.api.ui.UiApplication;

/**
 * This class extends the UiApplication class, providing a
 * graphical user interface.
 */
public class MyApp extends UiApplication
{
    /**
     * Entry point for application
     * @param args Command line arguments (not used)
     */ 
    public static void main(String[] args)
    {
        // Create a new instance of the application and make the currently
        // running thread the application's event dispatch thread.
        MyApp theApp = new MyApp();       
        theApp.enterEventDispatcher();
    }
    /**
     * Creates a new MyApp object
     */
    public MyApp()
    {        
        // Push a screen onto the UI stack for rendering.
        pushScreen(new MyScreen());
    }    
}

Finally run your application on real device or on the simulator. If you are planning to use simulator to test this on simulator you need to tun on wifi of the simulator (see this).

Thank you!
Happy coding! :)

Monday, May 27, 2013

How to change the background color of Android activity

Here I'm going to show the way to change the background color of the Android activity.


In order to change the activity's background color we need to do two changes.
First we need to add color property to strings.xml. Open the strings.xml in res >> values directory


Then create color property and add the value for color as shown below. (Color codes)

#000000

Now your strings.xml should like this.


    BgColor
    Settings
    Hello world!
    #000000

After changing strings.xml file we need to add android:background property to the activity layout xml file.
First open the activity_main.xml in the res >> layout directory.

Then add this line in to your layout xml
android:background="@color/black"
Here is the complete code for activity_main.xml
<RelativeLayout xmlns:android="http://schemas.android.com/apk/res/android"
    xmlns:tools="http://schemas.android.com/tools"
    android:background="@color/black"
    android:layout_width="match_parent"
    android:layout_height="match_parent"
    android:paddingBottom="@dimen/activity_vertical_margin"
    android:paddingLeft="@dimen/activity_horizontal_margin"
    android:paddingRight="@dimen/activity_horizontal_margin"
    android:paddingTop="@dimen/activity_vertical_margin"
    tools:context=".MainActivity" >
</RelativeLayout>

Resources:
 http://developer.android.com/guide/topics/resources/more-resources.html#Color

That's it, :)
Happy coding!
Your ideas are always welcome!!!

Saturday, December 8, 2012

Create java web service in Eclipse using Axis2 (Part 03)

This is the third part of create java web service using Axis2 tutorial. In this post I'm going to create a simple client program for the web service developed in previous tutorial. Before creating this program you have to complete my previous tutorials.

1. Create java web service in Eclipse using Axis2 (Part 01)
2. Create java web service in Eclipse using Axis2 (Part 02)

Before implementing the client first we have to find the wsdl file.
First run the created project on Tomcat server. To do this right click on project select Run As then select Run on Server.


Click on Services

Select Hello which is your web service class name. Under Available Operations you can see your web service operation.

 After clicking on Hello you can see the  WSDL file. Copy WSDL link to the clip board.


OK. We coppied the WSDL link.

Now we have to create the web service client.
Right click the web service class select New >> Other >> Web Services >> Web service Client. 


Click Next. Paste link of the wsdl file to the Service definition box. (If you want to access the wsdl in another computer via a net work replace "localhost" in the WSDL url with the ip address of the server machine)
Make sure that the Server runtime is Tomcat & the Web service runtime is Axis2 by clicking the links underlined red color in the following diagram.

Client type : Java Proxy


Click finish to generate Callback Handler & the Stub in same package where the web service class exists.(If you want to change the client package click next & give a package name to Custom package name as you wish)

Then create new class. Class name that I used is Client. Here is the project structure.


Following code shows how we can invoke the web service method using auto generated Stub. Paste this code to newly created class. This client class also in the same package with  web service class. 

 
package org.webapp.ws;
import org.webapp.ws.HelloStub.SayHello;

public class Client {
 public static void main(String[] args) throws Exception {
     HelloStub stub = new HelloStub();
    
     //Creating the request
     org.webapp.ws.HelloStub.SayHello  request = new  org.webapp.ws.HelloStub.SayHello();
     request.setName("Java web");
   
     //Invoking the service
     org.webapp.ws.HelloStub.SayHelloResponse response  = stub.sayHello(request);
     System.out.println("Response : " + response.get_return());
    }
}


Right click Client class and run the client as a java application.


Result :


Click here to download the complete project with client.

If you find this post helpful don't forget to leave a comment. Your comments always encourage me to write more!

Happy coding!