Wednesday, October 16, 2013

Run Google maps v2 on Android emulator

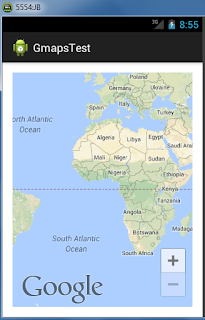
Most of the time running an Android application which uses Google maps api v2 on the Android emulator is bit difficult. In this post I'm going to discuss what are the changes that we have to do to the AVD to make the  Google maps available on Android emulator.
Lets see how to do this.

1. First create non Google API emulator and API level should be higher than 3.0 (I didn't check for older versions) Change the all other settings as you want. Here I have shown settings that I have used.


2. Download necessary apks.
3. Install  the apks
  • To install apk on the emulator we need to use adb install command, make sure that the adb command is working on your system. If it is not for Windows, add the path of the Android platform tools directory to the Windows path. Then you should be able to run ADB commands.
  • Start the newly created emulator using Android Virtual Device Manager.
  • Open the windows command prompt and change the directory to where you downloaded the apks.
  • Run the following command to install the Google play services apk on the emulator
    adb install com.google.android.gms.apk
  • Here the red colored part is the package name that you are going to install make sure that this is same as the apk name you have downloaded.
  • If the installation success you can see the Success message.
  • Then follow the same steps to install the Google play store apk.
  • Now the AVD is ready.
  • Run your own project or the project created in my previous tutorial by selecting the appropriate emulator from project run configurations.

Tuesday, October 15, 2013

Basic Android application with Google maps v2 API

In this post I will illustrate how to make settings for Google maps v2 API in Android Manifest.

1. Create an Android project.
  • Use API level 11 or above for minimum required SDK.
  • Give the same package name which you gave when you are obtaining the API key from Google.
  • Keep other settings as default 
 2. We need to make some changes Android Manifest.xml
  • Open the Manifest.xml and add following permissions as a child of the <manifest> element


  • Google Maps Android API uses OpenGL ES version 2 to render the map there for we need to define the feature in Manifest file. Add following lines as a child of the <manifest> element.

  • Add the API key by adding following lines as a child of the <application> element, inserting it just before the closing tag </application> 
 
  • Change the android:value="AIzaSyARrx5gAxtNJCHUBvwyIz4uZEFAm3R60kI" with the API key given by Google
  • Finally your Manifest.xml should be like this.


3. To use Google maps in our Android project we have to add Google play services lib project.
  • First check whether Google Play services are installed.
  • To do that open Android SDK manager expand the Extras.
  • Check the status of  Google Play Services is installed if it is not installed you have to install it first.
  • Then to import the Google play services lib project in to the work space, in Eclipse select
    File >> Import >> Android >> Existing Android Code Into Workspace
  • Click Next and select the Root Directory, browse to the google-play-services_lib. In my case it is in C:\Android\adt-bundle-windows-x86-20130219\sdk\extras\google\google_play_services\libproject\google-play-services_lib
  • Most of the time you can find it under the sdk\extras\google\google_play_services\libproject\ directory.  
  • Select the Copy project into workspace and click Finish.

4. The next step is to add the lib project into the our newly created project's references.
  • Right click on the project select Properties >> Android and then click on Add button under Library
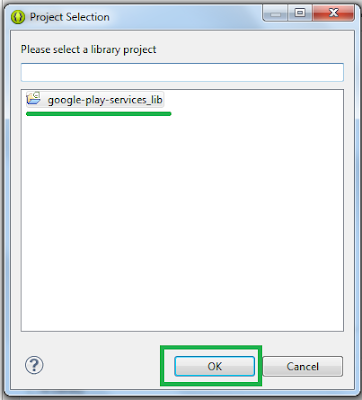
  •  In the project selection window select google-play-services_lib project and then click  OK
  •  Then under the libraries there should be the google-play-services_lib project with a green tick.

 5. As the final step we have to add the fragment for the map in to xml layout.
  • Open the res >> layout and activity xml lay out file and copy following code to create the fragment.

  • For this simplest example don't need to do any change for the Activitie's java file, keep it as it is.
import android.os.Bundle;
import android.app.Activity;
import android.view.Menu;

public class MainActivity extends Activity {

 @Override
 protected void onCreate(Bundle savedInstanceState) {
  super.onCreate(savedInstanceState);
  setContentView(R.layout.activity_main);
 }

 @Override
 public boolean onCreateOptionsMenu(Menu menu) {
  // Inflate the menu; this adds items to the action bar if it is present.
  getMenuInflater().inflate(R.menu.main, menu);
  return true;
 }
}

Now you can run the project. If you are running this on Android emulator you have to do certain installations on AVD I will describe that in my next post.


How to create basic Android Google maps v2 application and run it on emulator

In this post I'm going to illustrate how we can create a basic Google maps v2 application and how to run it on Android emulator.

Prerequisites for this application
Android sdk with API level 11 or above.

This post consists of three parts.
1. Obtaining a API key for Android.
2. Enabling Google maps v2 in Android emulator.
3. Creating a basic Android application which uses Google maps v2

Lets start with Google maps.
In this first part I'll describe how we can register for the Google maps API for Android
1. Obtaining a API key for Android.
To use Google maps API we need to register for the API and need to get a key for Android. This needs because of the security concerns of Google in order to prevent the abuse usage.
  • Then you will be pointed in to All services page.
  • Scroll down to this page and find Google Maps Android API v2 and click on the activate button.
  • Agree for the Google terms of services and click Accept.
  • Then Google Maps API should be turned on
  • From the left side pane click on API Access.
  • Select Create new Android key.
  • Then we need to find the SHA1 certificate fingerprint.
              - First find where is your debug.keystore file, usually in Windows you can find it in
                C:\Users\YOUR USER NAME\.android
              - Run the following command in Windows command prompt
                keytool -list -v -keystore C:\Users\YOUR USER NAME\.android\debug.keystore    
                -alias  androiddebugkey -storepass android -keypass android
             - The green colored one is the path for your debug.keystore.
             - Then you should be able to find the SHA1 fingerprint, mark it from command prompt,  
                it is something like this
                45:B5:E4:6F:36:AD:0A:98:94:B4:02:66:2B:12:17:F2:56:26:A0:E0
  • Paste SHA1 certificate fingerprint and package  name separated by a semicolon and click Create.
    Note: you have to use the same package name for the project what you have given here
  •  Then the API key will be generated and will be shown as follows.