1. Create an Android project.
- Use API level 11 or above for minimum required SDK.
- Give the same package name which you gave when you are obtaining the API key from Google.
- Keep other settings as default

- Open the Manifest.xml and add following permissions as a child of the <manifest> element
- Google Maps Android API uses OpenGL ES version 2 to render the map there for we need to define the feature in Manifest file. Add following lines as a child of the <manifest> element.
- Add the API key by adding following lines as a child of the <application> element, inserting it just before the closing tag </application>
- Change the android:value="AIzaSyARrx5gAxtNJCHUBvwyIz4uZEFAm3R60kI" with the API key given by Google
- Finally your Manifest.xml should be like this.
3. To use Google maps in our Android project we have to add Google play services lib project.
- First check whether Google Play services are installed.
- To do that open Android SDK manager expand the Extras.
- Check the status of Google Play Services is installed if it is not installed you have to install it first.

- Then to import the Google play services lib project in to the work space, in Eclipse select
File >> Import >> Android >> Existing Android Code Into Workspace

- Click Next and select the Root Directory, browse to the google-play-services_lib. In my case it is in C:\Android\adt-bundle-windows-x86-20130219\sdk\extras\google\google_play_services\libproject\google-play-services_lib
- Most of the time you can find it under the sdk\extras\google\google_play_services\libproject\ directory.
- Select the Copy project into workspace and click Finish.

4. The next step is to add the lib project into the our newly created project's references.
- Right click on the project select Properties >> Android and then click on Add button under Library

- In the project selection window select google-play-services_lib project and then click OK
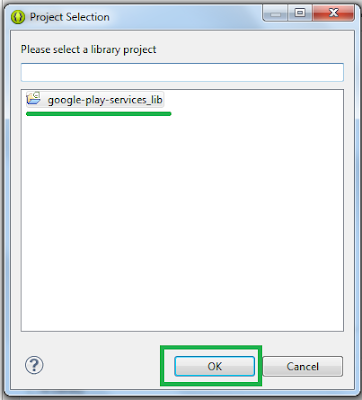

- Then under the libraries there should be the google-play-services_lib project with a green tick.

5. As the final step we have to add the fragment for the map in to xml layout.
- Open the res >> layout and activity xml lay out file and copy following code to create the fragment.
- For this simplest example don't need to do any change for the Activitie's java file, keep it as it is.
import android.os.Bundle;
import android.app.Activity;
import android.view.Menu;

public class MainActivity extends Activity {

 @Override
 protected void onCreate(Bundle savedInstanceState) {
  super.onCreate(savedInstanceState);
  setContentView(R.layout.activity_main);
 }

 @Override
 public boolean onCreateOptionsMenu(Menu menu) {
  // Inflate the menu; this adds items to the action bar if it is present.
  getMenuInflater().inflate(R.menu.main, menu);
  return true;
 }
}
Now you can run the project. If you are running this on Android emulator you have to do certain installations on AVD I will describe that in my next post.

Do you have a sample project/....
ReplyDelete