Wednesday, October 16, 2013

Run Google maps v2 on Android emulator

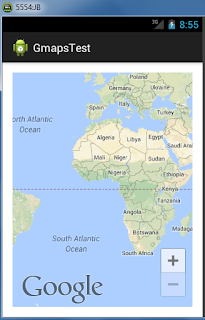
Most of the time running an Android application which uses Google maps api v2 on the Android emulator is bit difficult. In this post I'm going to discuss what are the changes that we have to do to the AVD to make the  Google maps available on Android emulator.
Lets see how to do this.

1. First create non Google API emulator and API level should be higher than 3.0 (I didn't check for older versions) Change the all other settings as you want. Here I have shown settings that I have used.


2. Download necessary apks.
3. Install  the apks
  • To install apk on the emulator we need to use adb install command, make sure that the adb command is working on your system. If it is not for Windows, add the path of the Android platform tools directory to the Windows path. Then you should be able to run ADB commands.
  • Start the newly created emulator using Android Virtual Device Manager.
  • Open the windows command prompt and change the directory to where you downloaded the apks.
  • Run the following command to install the Google play services apk on the emulator
    adb install com.google.android.gms.apk
  • Here the red colored part is the package name that you are going to install make sure that this is same as the apk name you have downloaded.
  • If the installation success you can see the Success message.
  • Then follow the same steps to install the Google play store apk.
  • Now the AVD is ready.
  • Run your own project or the project created in my previous tutorial by selecting the appropriate emulator from project run configurations.

Tuesday, October 15, 2013

Basic Android application with Google maps v2 API

In this post I will illustrate how to make settings for Google maps v2 API in Android Manifest.

1. Create an Android project.
  • Use API level 11 or above for minimum required SDK.
  • Give the same package name which you gave when you are obtaining the API key from Google.
  • Keep other settings as default 
 2. We need to make some changes Android Manifest.xml
  • Open the Manifest.xml and add following permissions as a child of the <manifest> element


  • Google Maps Android API uses OpenGL ES version 2 to render the map there for we need to define the feature in Manifest file. Add following lines as a child of the <manifest> element.

  • Add the API key by adding following lines as a child of the <application> element, inserting it just before the closing tag </application> 
 
  • Change the android:value="AIzaSyARrx5gAxtNJCHUBvwyIz4uZEFAm3R60kI" with the API key given by Google
  • Finally your Manifest.xml should be like this.


3. To use Google maps in our Android project we have to add Google play services lib project.
  • First check whether Google Play services are installed.
  • To do that open Android SDK manager expand the Extras.
  • Check the status of  Google Play Services is installed if it is not installed you have to install it first.
  • Then to import the Google play services lib project in to the work space, in Eclipse select
    File >> Import >> Android >> Existing Android Code Into Workspace
  • Click Next and select the Root Directory, browse to the google-play-services_lib. In my case it is in C:\Android\adt-bundle-windows-x86-20130219\sdk\extras\google\google_play_services\libproject\google-play-services_lib
  • Most of the time you can find it under the sdk\extras\google\google_play_services\libproject\ directory.  
  • Select the Copy project into workspace and click Finish.

4. The next step is to add the lib project into the our newly created project's references.
  • Right click on the project select Properties >> Android and then click on Add button under Library
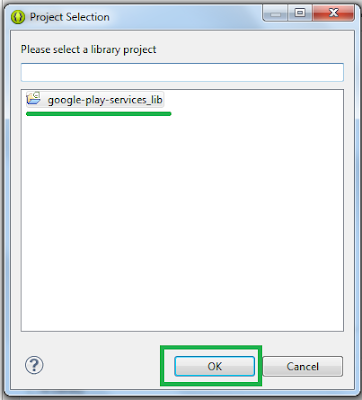
  •  In the project selection window select google-play-services_lib project and then click  OK
  •  Then under the libraries there should be the google-play-services_lib project with a green tick.

 5. As the final step we have to add the fragment for the map in to xml layout.
  • Open the res >> layout and activity xml lay out file and copy following code to create the fragment.

  • For this simplest example don't need to do any change for the Activitie's java file, keep it as it is.
import android.os.Bundle;
import android.app.Activity;
import android.view.Menu;

public class MainActivity extends Activity {

 @Override
 protected void onCreate(Bundle savedInstanceState) {
  super.onCreate(savedInstanceState);
  setContentView(R.layout.activity_main);
 }

 @Override
 public boolean onCreateOptionsMenu(Menu menu) {
  // Inflate the menu; this adds items to the action bar if it is present.
  getMenuInflater().inflate(R.menu.main, menu);
  return true;
 }
}

Now you can run the project. If you are running this on Android emulator you have to do certain installations on AVD I will describe that in my next post.


How to create basic Android Google maps v2 application and run it on emulator

In this post I'm going to illustrate how we can create a basic Google maps v2 application and how to run it on Android emulator.

Prerequisites for this application
Android sdk with API level 11 or above.

This post consists of three parts.
1. Obtaining a API key for Android.
2. Enabling Google maps v2 in Android emulator.
3. Creating a basic Android application which uses Google maps v2

Lets start with Google maps.
In this first part I'll describe how we can register for the Google maps API for Android
1. Obtaining a API key for Android.
To use Google maps API we need to register for the API and need to get a key for Android. This needs because of the security concerns of Google in order to prevent the abuse usage.
  • Then you will be pointed in to All services page.
  • Scroll down to this page and find Google Maps Android API v2 and click on the activate button.
  • Agree for the Google terms of services and click Accept.
  • Then Google Maps API should be turned on
  • From the left side pane click on API Access.
  • Select Create new Android key.
  • Then we need to find the SHA1 certificate fingerprint.
              - First find where is your debug.keystore file, usually in Windows you can find it in
                C:\Users\YOUR USER NAME\.android
              - Run the following command in Windows command prompt
                keytool -list -v -keystore C:\Users\YOUR USER NAME\.android\debug.keystore    
                -alias  androiddebugkey -storepass android -keypass android
             - The green colored one is the path for your debug.keystore.
             - Then you should be able to find the SHA1 fingerprint, mark it from command prompt,  
                it is something like this
                45:B5:E4:6F:36:AD:0A:98:94:B4:02:66:2B:12:17:F2:56:26:A0:E0
  • Paste SHA1 certificate fingerprint and package  name separated by a semicolon and click Create.
    Note: you have to use the same package name for the project what you have given here
  •  Then the API key will be generated and will be shown as follows.

Wednesday, August 14, 2013

How to consume a SOAP based web service from java

This post describes how we can access SOAP based web service from java using ksoap2 library. ksoap is a SOAP web service client library for constrained Java environments.

First download ksoap2:
https://code.google.com/p/ksoap2-android/wiki/HowToUse?tm=2
Then create a java project in Eclipse and add ksoap library to java build path.
Here is the sample code that can be used to access Currency Convertor web service hosted by http://www.webservicex.net
 
package com.mycode.soap;

import java.io.IOException;
import org.ksoap2.SoapEnvelope;
import org.ksoap2.serialization.PropertyInfo;
import org.ksoap2.serialization.SoapObject;
import org.ksoap2.serialization.SoapPrimitive;
import org.ksoap2.serialization.SoapSerializationEnvelope;
import org.ksoap2.transport.HttpTransportSE;
import org.xmlpull.v1.XmlPullParserException;

public class SoapTest {

 public static void main(String[] args) {
  try {
   final String NAMESPACE = "http://www.webserviceX.NET/";
   final String URL = "http://www.webservicex.net/CurrencyConvertor.asmx";
   final String SOAP_ACTION = "http://www.webserviceX.NET/ConversionRate";
   final String METHOD_NAME = "ConversionRate";
   SoapObject request = new SoapObject(NAMESPACE, METHOD_NAME);
   //set properties 
   PropertyInfo fromProp = new PropertyInfo();
   fromProp.setName("FromCurrency");
   fromProp.setValue("USD");
   fromProp.setType(String.class);
   request.addProperty(fromProp);

   PropertyInfo toProp = new PropertyInfo();
   toProp.setName("ToCurrency");
   toProp.setValue("LKR");
   toProp.setType(String.class);
   request.addProperty(toProp);

   SoapSerializationEnvelope envelope = new SoapSerializationEnvelope(
     SoapEnvelope.VER11);
   envelope.dotNet = true;
   envelope.setOutputSoapObject(request);
   HttpTransportSE androidHttpTransport = new HttpTransportSE(URL);

   androidHttpTransport.call(SOAP_ACTION, envelope);
   SoapPrimitive response = (SoapPrimitive) envelope.getResponse();
   String webResponse = response.toString();
   System.out.println(webResponse);
  } catch (XmlPullParserException e) {
   e.printStackTrace();
  } catch (IOException e) {
   e.printStackTrace();
  }
 }
}
} 
In line 36 I have set
envelope.dotNet = true;
For other web services comment that line.

Wednesday, July 31, 2013

Android MySQL PHP & JSON tutorial

In this post I'm going to describe how we can read data from MySQL database and show them in a Android list view. You can download the complete Android project from here. To fetch data here I used a PHP script which encodes data into json format.
This project has three main parts.
1. MySQL database
2. PHP web service
3.Android web service client

1. MySQL database.
My database has only one table named "emp_info" and it has two columns. "employee name" and "employee no". "employee no" is the primary key.


2.PHP web service
Use following PHP script to fetch data from the database and to encode data in to json format.

<?php
$host="XXXXX"; //replace with database hostname 
$username="XXXXX"; //replace with database username 
$password="XXXXX"; //replace with database password 
$db_name="XXXXXX"; //replace with database name

$con=mysql_connect("$host", "$username", "$password")or die("cannot connect"); 
mysql_select_db("$db_name")or die("cannot select DB");
$sql = "select * from emp_info"; 
$result = mysql_query($sql);
$json = array();

if(mysql_num_rows($result)){
while($row=mysql_fetch_assoc($result)){
$json['emp_info'][]=$row;
}
}
mysql_close($con);
echo json_encode($json); 
?> 
You can see the output of  php by clicking below url:
http://cpriyankara.coolpage.biz/employee_details.php

3.Android web service client.
This part is bit complected. Android activity is a combination of Async Task json and list view. If you are not familiar with those stuff look following tutorials.

Android Async Task and web service access
http://codeoncloud.blogspot.com/2013/07/android-web-service-access-using-async.html

Android list view
http://codeoncloud.blogspot.com/2013/07/how-to-populate-android-list-view-from.html

Here is the code for main Android activity.
package com.axel.mysqlphpjson;

import java.io.BufferedReader;
import java.io.IOException;
import java.io.InputStream;
import java.io.InputStreamReader;
import java.util.ArrayList;
import java.util.HashMap;
import java.util.List;
import java.util.Map;

import org.apache.http.HttpResponse;
import org.apache.http.client.ClientProtocolException;
import org.apache.http.client.HttpClient;
import org.apache.http.client.methods.HttpPost;
import org.apache.http.impl.client.DefaultHttpClient;
import org.json.JSONArray;
import org.json.JSONException;
import org.json.JSONObject;

import android.os.AsyncTask;
import android.os.Bundle;
import android.app.Activity;
import android.view.Menu;
import android.widget.ListView;
import android.widget.SimpleAdapter;
import android.widget.Toast;

public class MainActivity extends Activity {
 private String jsonResult;
 private String url = "http://cpriyankara.coolpage.biz/employee_details.php";
 private ListView listView;

 @Override
 protected void onCreate(Bundle savedInstanceState) {
  super.onCreate(savedInstanceState);
  setContentView(R.layout.activity_main);
  listView = (ListView) findViewById(R.id.listView1);
  accessWebService();
 }

 @Override
 public boolean onCreateOptionsMenu(Menu menu) {
  // Inflate the menu; this adds items to the action bar if it is present.
  getMenuInflater().inflate(R.menu.main, menu);
  return true;
 }

 // Async Task to access the web
 private class JsonReadTask extends AsyncTask<String, Void, String> {
  @Override
  protected String doInBackground(String... params) {
   HttpClient httpclient = new DefaultHttpClient();
   HttpPost httppost = new HttpPost(params[0]);
   try {
    HttpResponse response = httpclient.execute(httppost);
    jsonResult = inputStreamToString(
      response.getEntity().getContent()).toString();
   }

   catch (ClientProtocolException e) {
    e.printStackTrace();
   } catch (IOException e) {
    e.printStackTrace();
   }
   return null;
  }

  private StringBuilder inputStreamToString(InputStream is) {
   String rLine = "";
   StringBuilder answer = new StringBuilder();
   BufferedReader rd = new BufferedReader(new InputStreamReader(is));

   try {
    while ((rLine = rd.readLine()) != null) {
     answer.append(rLine);
    }
   }

   catch (IOException e) {
    // e.printStackTrace();
    Toast.makeText(getApplicationContext(),
      "Error..." + e.toString(), Toast.LENGTH_LONG).show();
   }
   return answer;
  }

  @Override
  protected void onPostExecute(String result) {
   ListDrwaer();
  }
 }// end async task

 public void accessWebService() {
  JsonReadTask task = new JsonReadTask();
  // passes values for the urls string array
  task.execute(new String[] { url });
 }

 // build hash set for list view
 public void ListDrwaer() {
  List<Map<String, String>> employeeList = new ArrayList<Map<String, String>>();

  try {
   JSONObject jsonResponse = new JSONObject(jsonResult);
   JSONArray jsonMainNode = jsonResponse.optJSONArray("emp_info");

   for (int i = 0; i < jsonMainNode.length(); i++) {
    JSONObject jsonChildNode = jsonMainNode.getJSONObject(i);
    String name = jsonChildNode.optString("employee name");
    String number = jsonChildNode.optString("employee no");
    String outPut = name + "-" + number;
    employeeList.add(createEmployee("employees", outPut));
   }
  } catch (JSONException e) {
   Toast.makeText(getApplicationContext(), "Error" + e.toString(),
     Toast.LENGTH_SHORT).show();
  }

  SimpleAdapter simpleAdapter = new SimpleAdapter(this, employeeList,
    android.R.layout.simple_list_item_1,
    new String[] { "employees" }, new int[] { android.R.id.text1 });
  listView.setAdapter(simpleAdapter);
 }

 private HashMap<String, String> createEmployee(String name, String number) {
  HashMap<String, String> employeeNameNo = new HashMap<String, String>();
  employeeNameNo.put(name, number);
  return employeeNameNo;
 }
}


Add Internet permission to AndroidManifest.xml
<?xml version="1.0" encoding="utf-8"?>
<manifest xmlns:android="http://schemas.android.com/apk/res/android"
    package="com.axel.mysqlphpjson"
    android:versionCode="1"
    android:versionName="1.0" >

    <uses-sdk
        android:minSdkVersion="8"
        android:targetSdkVersion="17" />

    <uses-permission android:name="android.permission.INTERNET" />

    <application
        android:allowBackup="true"
        android:icon="@drawable/ic_launcher"
        android:label="@string/app_name"
        android:theme="@style/AppTheme" >
        <activity
            android:name="com.axel.mysqlphpjson.MainActivity"
            android:label="@string/app_name" >
            <intent-filter>
                <action android:name="android.intent.action.MAIN" />

                <category android:name="android.intent.category.LAUNCHER" />
            </intent-filter>
        </activity>
    </application>

</manifest>

Code for main activity layout.
<RelativeLayout xmlns:android="http://schemas.android.com/apk/res/android"
    xmlns:tools="http://schemas.android.com/tools"
    android:layout_width="match_parent"
    android:layout_height="match_parent"
    android:paddingBottom="@dimen/activity_vertical_margin"
    android:paddingLeft="@dimen/activity_horizontal_margin"
    android:paddingRight="@dimen/activity_horizontal_margin"
    android:paddingTop="@dimen/activity_vertical_margin"
    tools:context=".MainActivity" >

    <ListView
        android:id="@+id/listView1"
        android:layout_width="match_parent"
        android:layout_height="wrap_content"
        android:layout_alignParentTop="true"
        android:layout_centerHorizontal="true"
        android:layout_marginTop="14dp" >
    </ListView>

</RelativeLayout>
Quick demo of the application:


Was above information helpful?
Your comments always encourage me to write more...

Monday, July 29, 2013

How to create a basic Android module for Appcelerator Titanium

In Titanium  using a module we can extend the built-in functionality of the Titanium Mobile SDK. In this post I'm going to illustrate how we can create a default Hello world Android module and how to install it to your project.
First of all we need to setup the development environment. See below requirements.
Prerequisites.
- Titanium studio with Android sdk
- Download the appropriate version of Android ndk from here http://developer.android.com/tools/sdk/ndk/index.html and extract it.
- Install Python 2.5 or above and set path for Python  in Windows system variables http://www.python.org/getit/
- Install Eclipse jdt plugin for Titanium.
http://docs.appcelerator.com/titanium/latest/#!/guide/Installing_the_Java_Development_Tools

Note : Your Titanium work space name should not have spaces


Then lets see how to create the Android module using ide.
Open Titanium studio.
Select File >> New >> Mobile Module Project


In next window, enter following information

Project name: Desired project name
Titanium SDK Version: Targeted version of Titanium SDK
Deployment target: Since this is Android module select Android


Click Next to edit Module Manifest File.


Enter
Version: Version of the module.

Author, License and description, etc.

At last click Finish to create the module.
After creating the module you can see src folder under project directory. By default there are two java classes ExampleProxy.java and Module.java
Open build.properties under the platform directory


By default that configures for the paths of
         titanium.platform
         android.platform
         google.apis


titanium.platform=C:\\Users\\cpriyankara\\AppData\\Roaming\\Titanium\\mobilesdk\\win32\\3.1.1.GA\\android
android.platform=C:\\SDK-Titanium\\sdk\\platforms\\android-10
google.apis=C:\\SDK-Titanium\\sdk\\add-ons\\addon-google_apis-google-10

You need to include path for Android ndk there. ie the location where you extracted the ndk archive. Add following line to build.properties
android.ndk = C:\\android_ndk\\android-ndk-r8e

Then right click on Build.xml and select Run As Ant Build


After complete the build process finally you should be able to see BUILD SUCCESSFUL message.

Then let's see how can we install created module in to Android Titanium project.
First of all Create new mobile project.(File >> New >> Mobile Project)


In next window select Classic from left side pane. Then select Default Project and click Next.


Fill Project name and app id fields. Select Android as Deployment target. Finally click Finish to create the project.


Next we need to install the created module in to our project. Open the module from project explorer. And open “dist” folder. In dist directory you can find the module in zipped  and jar formats.


Copy and paste the zipped archive to the root of your newly created project.


Then open tiapp.xml in xml view


Add following lines after the </mobileweb> tag to add and register the module.
<modules>
        <module platform="android" version="1.0">com.my.module</module>
</modules>
Here give same module version and module id as you provided when creating the module. Then press ctrl + s to save the change to Tiapp.xml. And test run the project on emulator. Make sure that your project is running without any module related errors.

References:
http://docs.appcelerator.com/titanium/3.0/#!/guide/Android_Module_Development_Guide-section-29004945_AndroidModuleDevelopmentGuide-Overview
https://wiki.appcelerator.org/display/tis/Using+Titanium+Modules